As a developer, I love automation, especially when it comes to DevOps processes like continuous integration (CI) and continuous deployment (CD) processes. Why? Well, one of the primary reasons is because it automates and orchestrates repeatable processes in a reliable way.
Three reasons to love CI/CD
Let me break down my top three reasons why I love CI/CD:
First, I love how I can create a gate that only deploys the project when all the tests pass.
Second, I don’t like writing documentation in the prose style. It takes longer to read a prose style documentation than it does to look at descriptive code.
Automated tests explain precisely what is and isn’t expected from a component.
Workflows used for deployment document the process of how and in what order things should be deployed.
Third, when you leverage infrastructure-as-code (IaC), the environment you deploy to isn’t just spelled out in code that documents precisely how the resources are configured, but it also makes the creation of these resources repeatable and thus reliable.
Not only that, but the files involved in IaC can be versioned and kept with your project.
What About You? What Do You Love (Or Hate) DevOps, CI/CD, or Automation?
Let me know! Drop me a tweet and let me know what you love, or hate about it!
I also love Azure Function Apps, and in this article, I’m going to marry the two topics. I’ll show you how I implement CI & CD in my Azure Functions Apps to deploy new and updated functions to Azure, provided I have a green build with passing tests as well as automate the entire process of creating (or updating) the necessary Azure resources using infrastructure-as-code with Bicep and the Azure Resource Manager.
Set the stage
Allow me to set the stage for what we’re doing so you have a good picture on where we are in this process.
When I push my project to my Github repo, I want the following to happen:
First, when I push to the master or main branch, I want a workflow to run all my tests to verify I’ve got a green build. That’s the continuous integration part.
Second, provided it’s a green build, I want to verify, create, or update the resources in Azure my project depends on. This is the infrastructure-as-code part. I’m using the same Bicep files I created in my article How to create Azure Function Apps with Bicep | step by step as my baseline, but I’ve added another Azure resource to the mix: an Azure App Configuration.
That’s used to store settings used by the app instead of using the app settings in the Azure Function App slots.
To get the app settings, we’re using Azure role based access control, RBAC, to use the Azure Function App’s managed identity and grant it permissions to the Azure App Configuration resource.
Lastly, once the Azure resources are created, I then want to deploy my function app codebase to the Azure Function App’s staging slot for smoke testing.
If you want to learn more how I do this, check out the video that accompany’s this article: How to: CI/CD/IaC for Azure Function Apps and GitHub Actions.
But why stop there… let’s keep going an automate the rollout to production. To do that…
- When I tag my repo and push that tag to the Github repo, a workflow creates a new release in Github and leaves it in draft state. This allows me to modify the draft name & description to explain what’s in it.
- Then, when I publish the release, another workflow fires to handle swapping of the staging and production slots.
Enough talk and architecture explanation, let’s get to it!
Starting point
Let’s first look at my project I have on my laptop. This sample project has two functions in it: heartbeat and simplemath. Both are pretty basic.
The heartbeat function just writes out the contents of a setting in an Azure App Configuration instance:
import { AzureFunction, Context, HttpRequest } from "@azure/functions"
import { DefaultAzureCredential } from "@azure/identity";
import { AppConfigurationClient } from "@azure/app-configuration";
import { Constants } from "../common";

/* istanbul ignore next */
const httpTrigger: AzureFunction = async function (context: Context, req: HttpRequest): Promise<void> {
  let error: Error | undefined = undefined;
  let response: string;

  // set up azure credentials
  const credential = new DefaultAzureCredential();
  // init appConfiguration client
  const appConfigClient = new AppConfigurationClient(`https://${process.env.APP_CONFIGURATION_NAME}.azconfig.io`, credential);

  // get properties
  const settingAppVersion = await appConfigClient.getConfigurationSetting({
    key: Constants.AppSettings.APP_VERSION, label: process.env.APP_CONFIGURATION_LABEL
  });
  const settingCommitHash = await appConfigClient.getConfigurationSetting({
    key: Constants.AppSettings.COMMIT_HASH, label: process.env.APP_CONFIGURATION_LABEL
  });

  response = `The HTTP trigger executed successfully. APP_VERSION=${settingAppVersion.value} && COMMIT_HASH=${settingCommitHash.value}.`;

  // respond
  context.res = (!error)
    ? { status: 200, body: response }
    : { status: 400, body: error.message };

};

export default httpTrigger;
The simplemath function is interesting as it has some tests and leverages Azure App Insights to track the entire request.
But the point I want to make about it in this video is how the settings are used to configure App Insights. The simplemath’s index file initializes App Insights. That calls the AppInsightsUtils.initDefaultConfig() method. If we take a look at that method, you can see how I’m using the telemetry initializer to include the my deployed project version in very bit of telemetry sent to App Insights.
import { AzureFunction, Context, HttpRequest } from '@azure/functions'
import * as AppInsights from 'applicationinsights';
import { add } from "./simpleMath";

const httpTrigger: AzureFunction = async function (context: Context, req: HttpRequest): Promise<void> {
  try {
    // trace the request
    AppInsights.defaultClient.trackTrace({ .. });

    const rawOperandA = new URLSearchParams(req.query).get('operandA');
    const rawOperandB = new URLSearchParams(req.query).get('operandB');

    if (!rawOperandA || !rawOperandA) {
      AppInsights.defaultClient.trackTrace({ .. });

      context.res = {
        status: 400,
        body: `Missing arguments 'operandA' & 'operandB' on querystring.`
      }
      context.done();
    } else {
      let operandA: number;
      let operandB: number;
      try {
        operandA = parseInt(rawOperandA as string);
      } catch { throw new Error('Unable to cast operandA as number.'); }
      try {
        operandB = parseInt(rawOperandB as string);
      } catch { throw new Error('Unable to cast operandB as number.'); }

      if (isNaN(operandA) || isNaN(operandB)) {
        throw new Error('Both operandA & operandB must be numbers.');
      }

      context.res = {
        status: 200,
        body: `The result of ${operandA} + ${operandB} = ${await add(operandA, operandB)}`
      };

      context.done();
    }
  } catch (error) {
    // track error
    AppInsights.defaultClient.trackException({ .. });

    // respond with error
    context.res = {
      status: 400,
      body: error.message
    };
    context.done();
  }

};

export default httpTrigger;
Let’s make sure everything works by first running the tests.
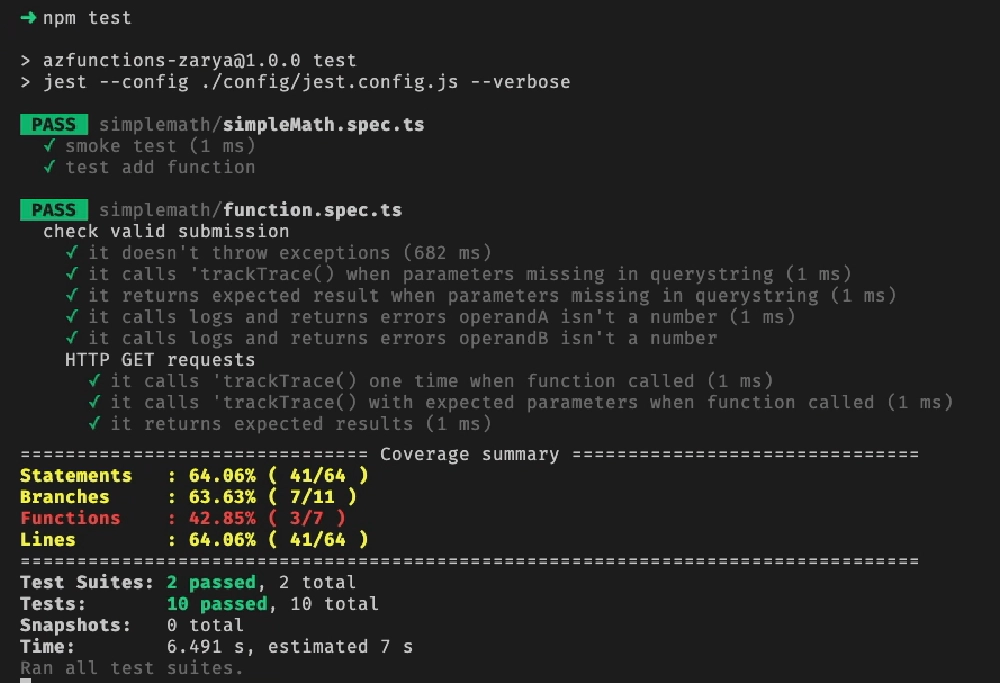
Test results (ignore coverage, only 1 function is tested in this case
With the project building & passing all tests, I’m going to push this to a brand new Github repo where we’ll run our workflows.
Set up Azure
Before I create & test a workflow, I need to do two things in Azure.
First, I need to create a resource group where I want my Azure Function App to go. I can do that using the Azure CLI pretty easily. To do that, I’ll run the following:
az group create --name SunshinePeacock --location eastus --tags lifecycle=disposable
Second, I need to create an Microsoft Entra ID app that the workflow will use to create the deployment & interact with the Azure Function App the deployment creates.
Entra ID app
So, I’ll head over to my Entra ID tenant in the Azure portal. On the App registrations page, I’ll create the app and accept all defaults, just entering in a name for the app: SunshinePeacock Bot.
On the Certificates & secrets page, I’m going to configure this app with a federated credential for Github. This capability between Entra ID and Github. What this allows me to do is basically configure this app to automatically trust a Github credential with specific attributes.
From my workflow, Github will use OpenID Connect to authenticate with Azure. The request from Github includes a bunch of information on who’s requesting the token.
So, what I’ll do is set the Federated credential scenario to Github actions, the Organization to my Github organization, the Repository to the name of my Github repo, the Entity type to Branch, and the Based on selection to master.
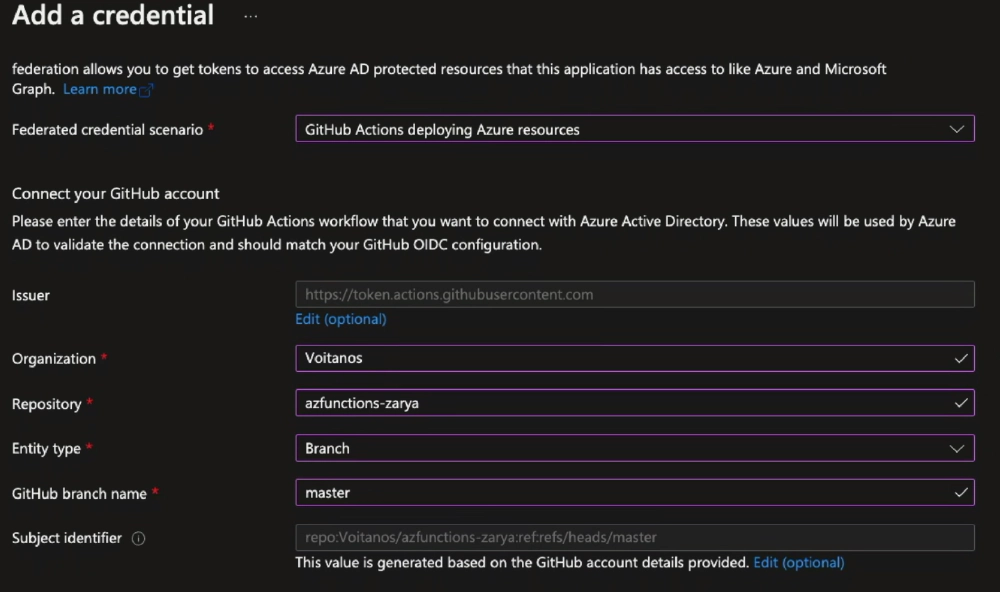
Configure a federated credential for an Entra ID app to trust a specific Github branch in a repository
Configure a federated credential for an Entra ID app to trust a specific Github branch in a repository
This configures Entra ID to say:

Some process in Azure
Entra ID
So, when my workflow authenticates, it will authenticate as this app.
And the best part is there’s no secret or certificate to keep track of! Because all Github needs is the IDs of the Azure subscription, tenant, and Entra ID app ID to know who to authenticate as. That’s even more secure than keeping track of a secret! it’s basically treating my master branch in a specific repo as a Managed Identity.
To give the workflow the ability to create the resources using this Entra ID app, I need to go to the resource group we created and grant this app the owner role to create deployments.
Do this from the resource’s Access control (IAM) screen. Select Add > Add role assignment, select the Owner role, and add Entra ID service principal to it.
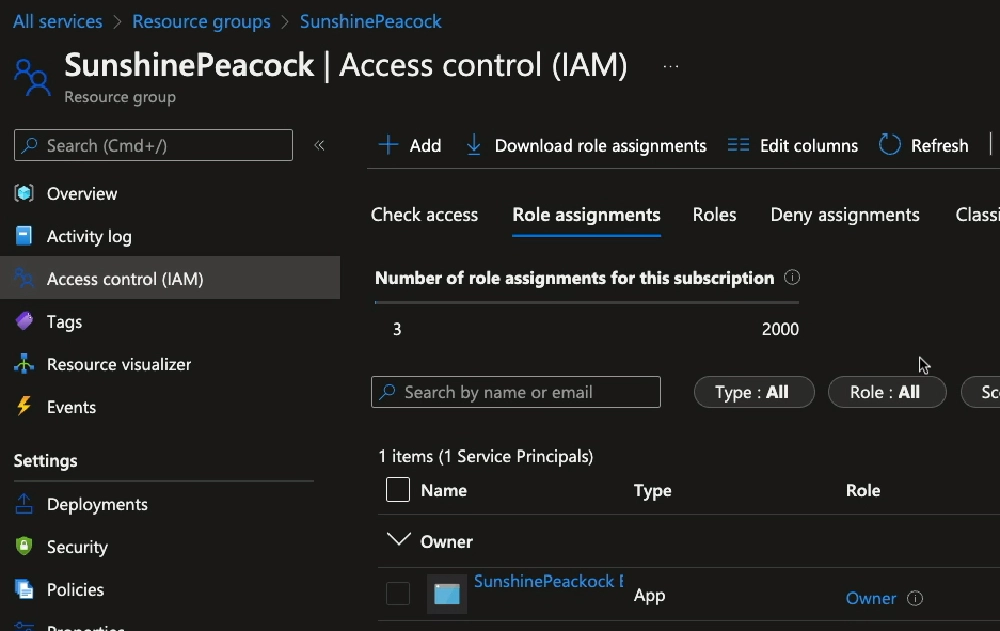
RBAC configuration granting the Entra ID app owner rights over the resource group
The last step is to add some secrets to our Github repo so the workflow can authenticate as the Entra ID app and to define the resource group where they’ll be created.
You can do this in the Github UI, or use the Github CLI to do this, which is what I’ll do.
I’ve already installed it and logged in. I’ll plug in the values of my subscription ID, tenant ID and app ID… all values you can get from the apps overview page in Entra ID.
gh secret set AZURE_SUBSCRIPTION_ID --app actions --body 00000000-0000-0000-0000-000000000000
gh secret set AZURE_TENANT_ID --app actions --body 00000000-0000-0000-0000-000000000000
gh secret set AZURE_CLIENT_ID --app actions --body 00000000-0000-0000-0000-000000000000
Next, I’ll set the secret for the resource group we created using:
gh secret set AZURE_FUNCTIONAPP_RESOURCEGROUP --app actions --body SunshinePeacock
And finally, I’ll set the prefix name I want to use for all the Azure resources created in the deployment:
gh secret set AZURE_RESOURCE_NAME_PREFIX --app actions --body zarya1
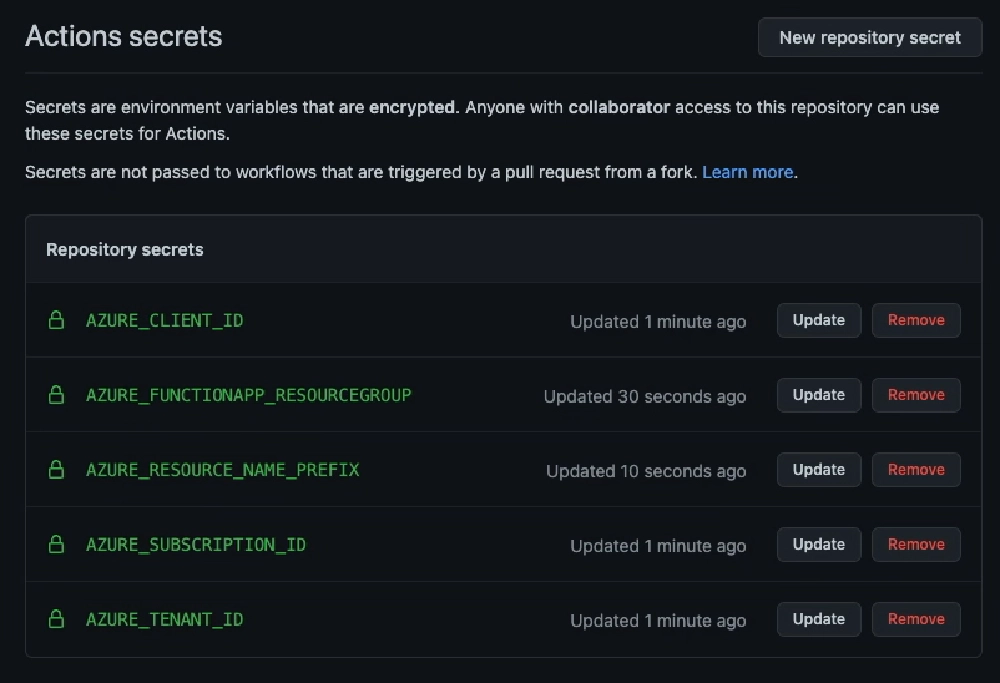
Github repo secrets for Entra ID authentication & where to provision Azure resources
Create test-build-create-deploy workflow
Now everything is set up, so I can create the Github workflow. Github workflows go in the .github/workflow folder, so I’ll create that and then, create the workflow file test-deploy-to-staging.yml
Give the workflow a name, and then configure when it runs. I’ll set this to only run on when there’s a push to the master or development branch.
name: Staging build, test & deploy app

on:
  workflow_dispatch:
  push:
    branches:
      - master
      - development
    paths-ignore:
      - '**/**.md'
Next, set the environment variables for the workflow. I like to include the secrets I depending on existing in the Github repo as well for reference.
env:
  NODE_VERSION: '14.x'

  # all Azure Functions are at the root of the project
  AZURE_FUNCTION_APP_PACKAGE_PATH: ''

  # ARM deployment instance name (used to extract outputs)
  # -----------------------------------------------
  DEPLOYMENT_NAME: GH_CICD_${{ github.run_id }}

  # bot credentials deployments rights on resource group
  # -----------------------------------------------
  # AZURE_CLIENT_ID: <secret>
  # AZURE_TENANT_ID: <secret>
  # AZURE_SUBSCRIPTION_ID: <secret>

  # function app settings
  # -----------------------------------------------
  # AZURE_FUNCTIONAPP_RESOURCEGROUP: <secret>
  # AZURE_RESOURCE_NAME_PREFIX: <secret>

  # variables dynamically set in workflow after running ARM deployment step
  # -----------------------------------------------
  # FUNCTION_APP_NAME: <env>
  # FUNCTION_APP_SLOT_NAME: <env>
  # AZURE_APPCONFIG_NAME: <env>
  # FUNCTION_APP_PUB_PROFILE: <env>
One variable I like to create is the DEPLOYMENT_NAME which is a string that contains the ID of the run in Github. Later I can use this to see which workflow run triggered which deployment in Azure.
The last block of variables are those that will be dynamically created & set within the workflow from running the deployment job.
Finally, the last thing to do before we create the jobs is to tell Github what permissions this workflow needs. This is what triggers Github to issue an OpenID Connect request to Entra ID using the federated credentials we set up.
permissions:
  id-token: write
  contents: read
Job: Test
The first job to create is the test job. The comments before each step should explain exactly what’s going on.
test:
  if: "!contains(github.event.head_commit.message,'[skip-ci]')"
  name: Run all tests
  runs-on: ubuntu-latest
  steps:
    ######################################################################
    # checkout full codebase
    ######################################################################
    - name: Checkout repo codebase
      uses: actions/checkout@master
      with:
        fetch-depth: 1
        clean: true
        submodules: false

    ######################################################################
    # configure Node.js
    ######################################################################
    - name: 🔧 Set up Node ${{ env.NODE_VERSION }} environment
      uses: actions/setup-node@v1
      with:
        node-version: ${{ env.NODE_VERSION }}

    ######################################################################
    # restore cached dependencies
    ######################################################################
    - name: ♻️ Restore cached dependencies
      uses: actions/cache@v2
      id: node_module_cache
      with:
        path: node_modules
        key: ${{ runner.os }}-${{ env.NODE_VERSION }}-node_modules-${{ hashFiles('package-lock.json') }}

    ######################################################################
    # install dependencies (if restore cached deps failed)
    ######################################################################
    - name: ⬇️ Install dependencies
      if: steps.node_module_cache.outputs.cache-hit != 'true'
      shell: bash
      run: |
        pushd './${{ env.AZURE_FUNCTION_APP_PACKAGE_PATH }}'
        npm install
        popd

    ######################################################################
    # build project
    ######################################################################
    - name: 🙏 Build project
      shell: bash
      run: |
        pushd './${{ env.AZURE_FUNCTION_APP_PACKAGE_PATH }}'
        npm run build --if-present
        popd

    ######################################################################
    # run tests
    ######################################################################
    - name: 🧪 Run all tests
      run: |
        pushd './${{ env.AZURE_FUNCTION_APP_PACKAGE_PATH }}'
        npm run prep --if-present
        npm test --verbose
        popd

    ######################################################################
    # save test output
    ######################################################################
    - name: 📄 Save code coverage results (report)
      uses: actions/upload-artifact@v1
      with:
        name: COVERAGE_REPORT
        path: temp/lcov-report
Job: deploy_infra
The next job is to deploy the infrastructure. I’m going to set the dependency of this job on the test job so that it only runs when the test job succeeds.
deploy_infra:
    if: "!contains(github.event.head_commit.message,'[skip-infra]')"
    name: Deploy infrastructure
    runs-on: ubuntu-latest
    needs: test
After it first checks out the codebase, it then logs into Azure using the azure/login action. This action will use the OpenID connect support Github includes and the credentials we pass in from our secrets we saved to obtain an access token that will be used in the next step.
######################################################################
# login to Azure CLI via federated credential
######################################################################
- name: 🔑 Login to Azure
  uses: azure/login@v1
  with:
    client-id: ${{ secrets.AZURE_CLIENT_ID }}
    tenant-id: ${{ secrets.AZURE_TENANT_ID }}
    subscription-id: ${{ secrets.AZURE_SUBSCRIPTION_ID }}
The last step is where we’ll create the Azure resources using our Bicep file I showed you how to create in that other video. Notice the two DEPLOYMENT_NAME environment variables I’m passing in.
######################################################################
# Provision Azure resources
######################################################################
- name: 🏗 Deploy infrastructure
  run: |
    az deployment group create --name $DEPLOYMENT_NAME --resource-group $RESOURCE_GROUP --template-file ./infra/main.bicep --parameters deploymentNameId=$DEPLOYMENT_NAME_ID resourceNamePrefix=$RESOURCE_NAME_PREFIX
  env:
    DEPLOYMENT_NAME: ${{ env.DEPLOYMENT_NAME }}
    DEPLOYMENT_NAME_ID: ${{ github.run_id }}
    RESOURCE_GROUP: ${{ secrets.AZURE_FUNCTIONAPP_RESOURCEGROUP }}
    RESOURCE_NAME_PREFIX: ${{ secrets.AZURE_RESOURCE_NAME_PREFIX }}
One of them is the name of the deployment that we set in our environment variables at the top of the file. This will have name that includes the workflow run ID, but it also includes a prefix to indicate that a Github workflow is what triggered it.
The DEPLOYMENT_NAME_ID is the run ID. That’s included in my Bicep file as a parameter because any Bicep modules the main.bicep file calls will get this in their name, so I can easily look at all deployments and see all that were associated with a specific run.
Job: deploy_app
The last job is to deploy the app.
deploy_app:
  if: "!contains(github.event.head_commit.message,'[skip-cd]')"
  name: Deploy to Azure Function app staging slot
  runs-on: ubuntu-latest
  needs: [test,deploy_infra]
This job has a dependency on both the test & deploy_infra jobs. They must both succeed before this runs.
The bulk of this is pretty straight forward, checking out the codebase, setting up Node, restoring the node_modules cache or running npm install if the cache wasn’t found, and building the project… same as the test job above.
It then signs into Azure with the CLI using the same azure/login Github action using the federated credential… again, same as the deploy_infra job.
The next step gets the outputs from the deployment job and saves the values as variables in our workflow. It does this by storing the output of a query using the az deployment group show command. Because I know what the deployment name was that we rant above, I can query it for specific values the deployment we executed using the Bicep file. I’m looking for the functionAppName, the name of the staging slot on the function app, and the name of the Azure App Configuration resource that we created.
######################################################################
# promote deployment provisioning outputs to workflow variables
######################################################################
- name: 🧲 Extract deployment job ouputs to env variables
  run: |
    echo "FUNCTION_APP_NAME=$(az deployment group show --name ${{ env.DEPLOYMENT_NAME }} --resource-group ${{ env.RESOURCE_GROUP }} --query 'properties.outputs.functionAppName.value' --output tsv)" >> $GITHUB_ENV
    echo "FUNCTION_APP_SLOT_NAME=$(az deployment group show --name ${{ env.DEPLOYMENT_NAME }} --resource-group ${{ env.RESOURCE_GROUP }} --query 'properties.outputs.functionAppSlotName.value' --output tsv)" >> $GITHUB_ENV
    echo "AZURE_APPCONFIG_NAME=$(az deployment group show --name ${{ env.DEPLOYMENT_NAME }} --resource-group ${{ env.RESOURCE_GROUP }} --query 'properties.outputs.appConfigName.value' --output tsv)" >> $GITHUB_ENV
  env:
    DEPLOYMENT_NAME: ${{ env.DEPLOYMENT_NAME }}
    RESOURCE_GROUP: ${{ secrets.AZURE_FUNCTIONAPP_RESOURCEGROUP }}
To deploy my function, I need to get the publishing profile for the Function app’s staging slot. So again, I’ll use the Azure CLI to retrieve this as XML from the Function app and store it in an environment variable in our function.
To do this, I’m using some of the output values we just retrieved in the previous step from the deployment process.
######################################################################
# acquire publish profile for Azure Functions App
######################################################################
- name: ⬇️ Download Azure Function app publishing profile
  id: az_funcapp_publishing_profile
  run: |
    echo "FUNCTION_APP_PUB_PROFILE=$(az functionapp deployment list-publishing-profiles --subscription $AZURE_SUBSCRIPTION_ID --resource-group $FUNCTION_APP_RESOURCE_GROUP --name $FUNCTION_APP_NAME --slot $FUNCTION_APP_SLOT_NAME --xml)" >> $GITHUB_ENV
  env:
    AZURE_SUBSCRIPTION_ID: ${{ secrets.AZURE_SUBSCRIPTION_ID }}
    FUNCTION_APP_RESOURCE_GROUP: ${{ secrets.AZURE_FUNCTIONAPP_RESOURCEGROUP }}
    FUNCTION_APP_NAME: ${{ env.FUNCTION_APP_NAME }}
    FUNCTION_APP_SLOT_NAME: ${{ env.FUNCTION_APP_SLOT_NAME }}
Once I have the publishing profile, I can use the azure/functions-action Github action to deploy my app.
######################################################################
# deploy function app
######################################################################
- name: 🚀 Deploy Azure Functions app
  uses: Azure/functions-action@v1
  with:
    app-name: ${{ env.FUNCTION_APP_NAME }}
    package: '.'
    publish-profile: ${{ env.FUNCTION_APP_PUB_PROFILE }}
    respect-funcignore: true
The last two are some special sauce I like to add. My Azure App Configuration resource contains two values for the version of the app commit hash from the repo that’s currently deployed. I’m using the Azure CLI to set the value of the staging label for these two settings.
######################################################################
# update app configuration values with version
######################################################################
- name: 📄 Set Azure Application Configuration key "APP_VERSION"
  run: |
    az appconfig kv set --key $APP_CONFIG_KEY_NAME --value $APP_CONFIG_KEY_VALUE --label $APP_CONFIG_KEY_LABEL --name $AZURE_APPCONFIG_NAME --auth-mode login --yes
  env:
    AZURE_APPCONFIG_NAME: ${{ secrets.AZURE_APPCONFIG_NAME }}
    APP_CONFIG_KEY_NAME: APP_VERSION
    APP_CONFIG_KEY_VALUE: staging
    APP_CONFIG_KEY_LABEL: staging

######################################################################
# update app configuration value COMMIT_HASH
######################################################################
- name: 📄 Set Azure Application Configuration key "COMMIT_HASH"
  run: |
    az appconfig kv set --key $APP_CONFIG_KEY_NAME --value $APP_CONFIG_KEY_VALUE --label $APP_CONFIG_KEY_LABEL --name $AZURE_APPCONFIG_NAME --auth-mode login --yes
  env:
    AZURE_APPCONFIG_NAME: ${{ secrets.AZURE_APPCONFIG_NAME }}
    APP_CONFIG_KEY_NAME: COMMIT_HASH
    APP_CONFIG_KEY_VALUE: ${{ github.sha }}
    APP_CONFIG_KEY_LABEL: staging
Commit & test
Let’s see it work! I’ll save my workflow & push it to the repo.
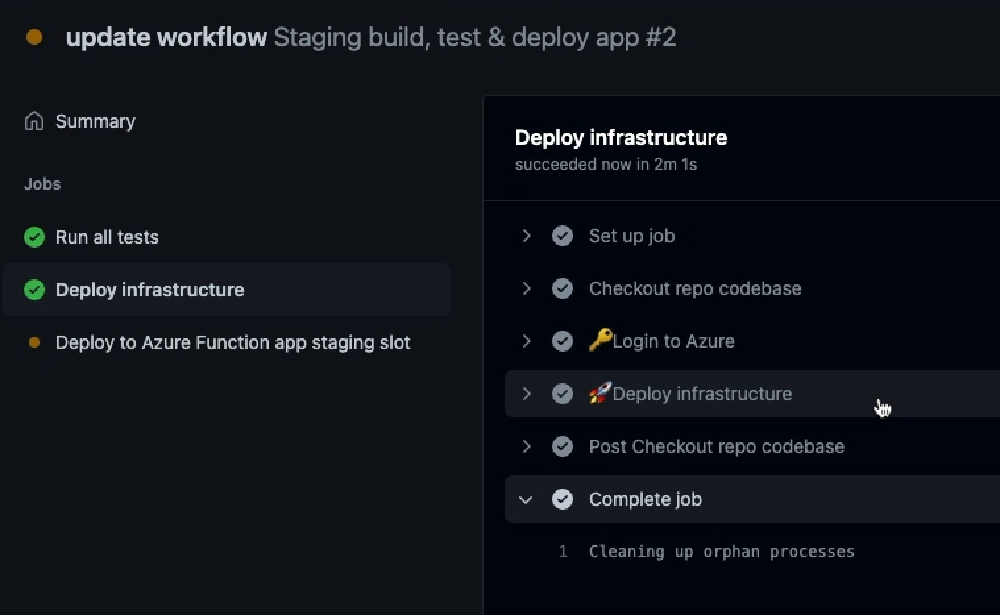
Github workflow run status
Github workflow run status
Now that the workflow is finished, let’s check out our deployment!
Back in the Azure portal, let’s jump into the resource group and here we can see all the resources.
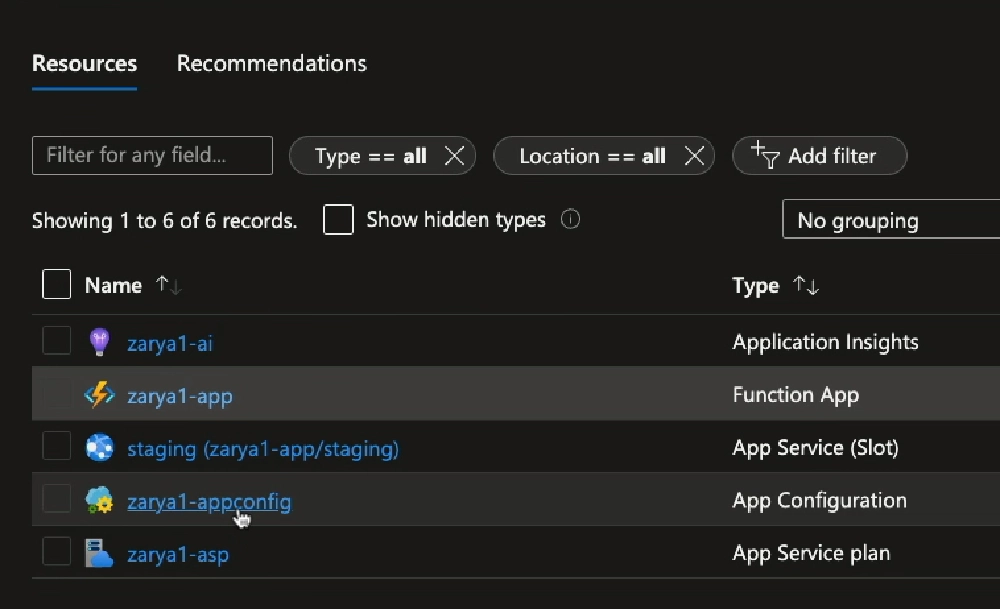
Azure resources created in the resource group
If we look at the deployments, we see three deployments. Remember, our Bicep file main.bicep called two Bicep modules, which is why we see three listed.
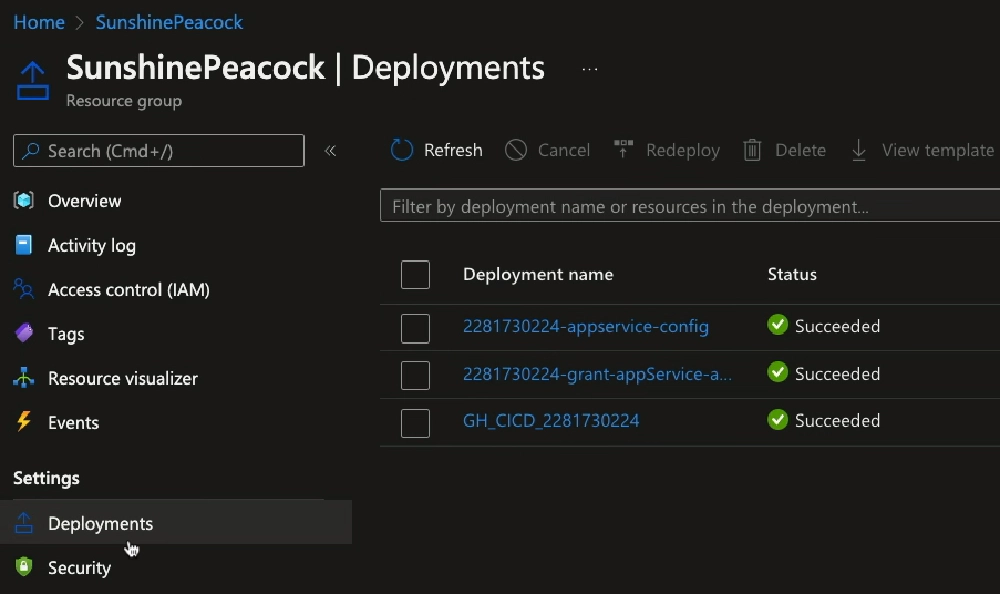
Deployments created from executing the Bicep file main.bicep from the workflow
Notice the run ID, 22817300224, is the same across all three? This is how I’m able to tie them all to a specific Github workflow run… the run ID can be found in the URL of the workflow run: https://github.com/voitanos/azurefunctions-zarya/actions/runs/22817300224
After this initial deployment, we need to add one more secret to the Github repo: the name of the Azure App Configuration resource. This is because we’ll be updating the values of the production settings when we do a deployment.
Those workflows run separately from this one, so we don’t have context for the name of the deployment to query the outputs. Do this using the Github browser interface or the CLI to create the secret.
gh secret set AZURE_APPCONFIG_NAME --app actions --body zarya1-appconfig
While this is cool, let’s go further and see how to automate the swapping of the staging & production slots!
Deploy
Let’s drop two new workflows in the repo and push them to Github: draft-release.yml & deploy-release.yml.
The draft-release.yml workflow will fire when a new tag is pushed to the repo. It creates a new release in draft mode on the repo. This gives me a chance to set the release name and description what’s included in the release.
name: Draft a new release

on:
  push:
    tags:
      - '*.*.*'

jobs:
  create-draft-release:
    runs-on: ubuntu-latest
    steps:
      ######################################################################
      # get the tag name
      ######################################################################
      - name: 🏷 Get tag from the push
        id: set_varaibles
        run: |
          echo ::set-output name=tag::${GITHUB_REF#refs/*/}

      ######################################################################
      # create a new draft release
      ######################################################################
      - name: 𖭦 Create new draft release
        uses: actions/create-release@v1
        env:
          GITHUB_TOKEN: ${{ secrets.GITHUB_TOKEN }}
        with:
          tag_name: ${{ steps.set_varaibles.outputs.tag }}
          release_name: v${{ steps.set_varaibles.outputs.tag }}
          body: ${{ github.event.head_commit.message }}
          draft: true
          prerelease: false
Test this out by adding & pushing a tag to the repo:
git tag 0.0.1
git push --tags
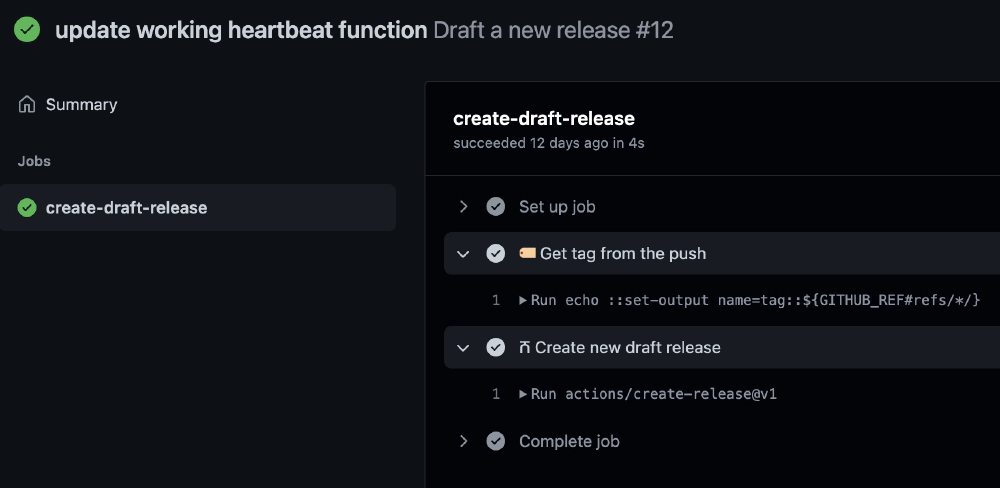
Results of pushing a tag to the master branch of the Github repository
Now let’s look at the deploy-release.yml workflow. Unfortunately we have one secret we need to create: the trusted credential support that Entra ID has with Github doesn’t support the trigger that will cause this workflow to run… at least not at the time I created this video.
So… unfortunately we can’t use that style of authentication in this case. Instead, I need to go add a client secret to the Entra ID app and store it as a secret in the Github repository.
With that secret set, let’s look at this workflow.
The first job will first sign in to Azure using the client ID & secret as a service principal:
- name: 🔑 Login to Azure
  run: |
    az login --service-principal --tenant $TENANT_ID --username $CLIENT_ID --password $CLIENT_SECRET
  env:
    TENANT_ID: ${{ secrets.AZURE_TENANT_ID }}
    CLIENT_ID: ${{ secrets.AZURE_CLIENT_ID }}
    CLIENT_SECRET: ${{ secrets.AZURE_CLIENT_SECRET }}
It then uses the Azure CLI to swap the production & staging slots by calling the az fucntionapp deployment slot swap command:
- name: 🔀 Swap staging & production deployment slot
  run: |
    az functionapp deployment slot swap --resource-group $FUNCTION_APP_RESOURCE_GROUP --name $FUNCTION_APP_NAME --slot $FUNCTION_APP_STAGING_SLOT --target-slot $FUNCTION_APP_PRODUCTION_SLOT
  env:
    FUNCTION_APP_RESOURCE_GROUP: ${{ secrets.AZURE_FUNCTIONAPP_RESOURCEGROUP }}
    FUNCTION_APP_NAME: ${{ env.AZURE_FUNCTION_APP_NAME }}
    FUNCTION_APP_STAGING_SLOT: ${{ env.AZURE_FUNCTION_APP_STAGING_DEPLOYMENT_SLOT }}
    FUNCTION_APP_PRODUCTION_SLOT: ${{ env.AZURE_FUNCTION_APP_PRODUCTION_DEPLOYMENT_SLOT }}
Once the slots have been swapped, the next job then updates the production labels of the settings in the Azure App Configuration resource to reflect the production version and commit of the app that’s running on the production slot.
######################################################################
# update app configuration value APP_VERSION
######################################################################
- name: 📄 Set Azure Application Configuration key "APP_VERSION"
  run: |
    az appconfig kv set --key $APP_CONFIG_KEY_NAME --value $APP_CONFIG_KEY_VALUE --label $APP_CONFIG_KEY_LABEL --name $AZURE_APPCONFIG_NAME --auth-mode login --yes
  env:
    AZURE_APPCONFIG_NAME: ${{ secrets.AZURE_APPCONFIG_NAME }}
    APP_CONFIG_KEY_NAME: APP_VERSION
    APP_CONFIG_KEY_VALUE: ${{ github.event.release.tag_name }}
    APP_CONFIG_KEY_LABEL: production

######################################################################
# update app configuration value COMMIT_HASH
######################################################################
- name: 📄 Set Azure Application Configuration key "COMMIT_HASH"
  run: |
    az appconfig kv set --key $APP_CONFIG_KEY_NAME --value $APP_CONFIG_KEY_VALUE --label $APP_CONFIG_KEY_LABEL --name $AZURE_APPCONFIG_NAME --auth-mode login --yes
  env:
    AZURE_APPCONFIG_NAME: ${{ secrets.AZURE_APPCONFIG_NAME }}
    APP_CONFIG_KEY_NAME: COMMIT_HASH
    APP_CONFIG_KEY_VALUE: ${{ github.sha }}
    APP_CONFIG_KEY_LABEL: production
Let’s see it work… in the browser, I’ll go to the releases in the repo, edit the draft release, and hit publish.
That should kick off the workflow.
Now that the workflow is finished, let’s check out our deployment!
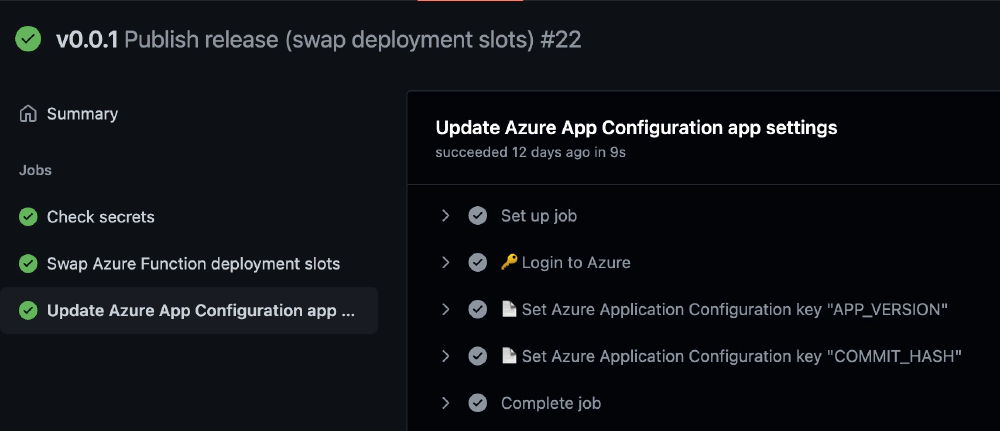
Workflow run after publishing a draft Github release
Pretty cool! So you’ve now seen a structured deployment of an Azure Functions app, complete with continuous integration & continuous deployment process, that also leverages infrastructure-as-code to provision the Azure resources.
Going forward, our entire deployment process either to staging or production is entirely handled by pushing commits to the Github repo’s master branch and controlling the rollout to production using Github releases!
Download Article Resources
Want the resources for this article? Enter your email and we'll send you the download link.
Microsoft MVP, Full-Stack Developer & Chief Course Artisan - Voitanos LLC.
Andrew Connell is a full stack developer who focuses on Microsoft Azure & Microsoft 365. He’s a 21-year recipient of Microsoft’s MVP award and has helped thousands of developers through the various courses he’s authored & taught. Whether it’s an introduction to the entire ecosystem, or a deep dive into a specific software, his resources, tools, and support help web developers become experts in the Microsoft 365 ecosystem, so they can become irreplaceable in their organization.


