In the last few weeks, I’ve published my series of definitive guides for developing SharePoint Framework solutions for all SharePoint Server deployments. You can check out the series here:
- Definitive guide for developers: SharePoint Framework for SharePoint Server 2016
- Definitive guide for developers: SharePoint Framework for SharePoint Server 2019
- Definitive guide for developers: SharePoint Framework for SharePoint Server Subscription Edition (SE)
When I was working on this series, I asked the students of my Mastering the SharePoint Framework course what questions they would like to see answered. One common one kept coming up:

John Doe
Silhouette Vice President - Acme Inc.
In this post, I’ll answer those questions by showing you how I set up my development environment. You’ll learn the following things from this post:
- Managing multiple Node.js versions
- SharePoint Framework development for SharePoint Server 2016 with Feature Pack 2
- SharePoint Framework development for SharePoint Server 2019 & Subscription Edition (SE)
- SharePoint Framework development for SharePoint Online
- Try out SharePoint Framework betas
You’ll also learn how, by using the approach I outline in this post, how you don’t have to uninstall anything to jump between environments. Once set up, you can jump between environments freely. That’s what I do… the only things I have to update are the last two in my list above because betas change & when working with SharePoint Online SPO, I always want to be on the latest version of SPFx available.
This post is only going to focus on the tools specific to SPFx development that you need. While I primarily work on macOS, I’ll cover Windows as well.
Let’s get started!
☝ I’ll keep this posted updated as new releases of the SharePoint Framework are available. For reference, at the time of writing,
Multiple Node.js versions
First things first, you’re going to need to figure out how to run multiple Node.js versions because the tools you’ll install to work with each SharePoint deployment
Node.js doesn’t allow for multiple versions to be installed at the same time.
One option is to use virtual machines, one for each target environment. This option is pretty self explanatory.
The other option is to use a Node Version Manager (NVM). I’ve written about this approach few times:
- Better Node.js Install Management with Node Version Manager
- Try SharePoint Framework Preview Releases with NVM
There’s the original one for macOS, NVM, and a port for Windows, nvm-Windows. I recommend using NVM, not a virtual machine. It just makes your life so much easier.
For the remainder of this post, I’ll assume you’re using an NVM for your platform of choice. For all environments, I’m going to share what versions I use to create projects. You can get the full “what you need” vs. “what’s supported” vs. “what I recommend” from each of the definitive guides for each environment linked to above.
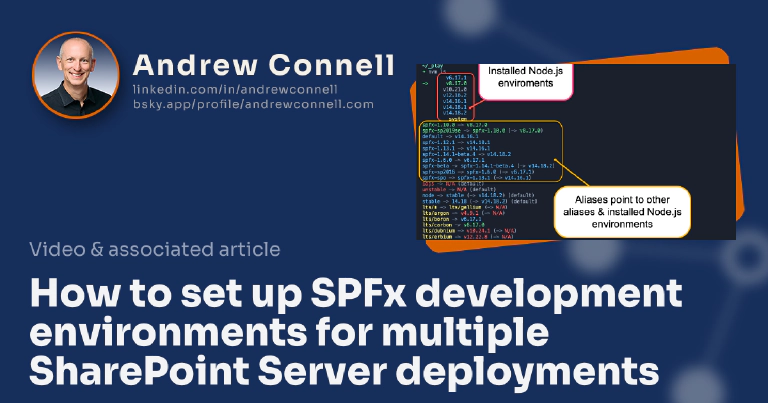
With the steps I’m outlining in this post, once you’re finished, you can have a dev environment set up like the following:
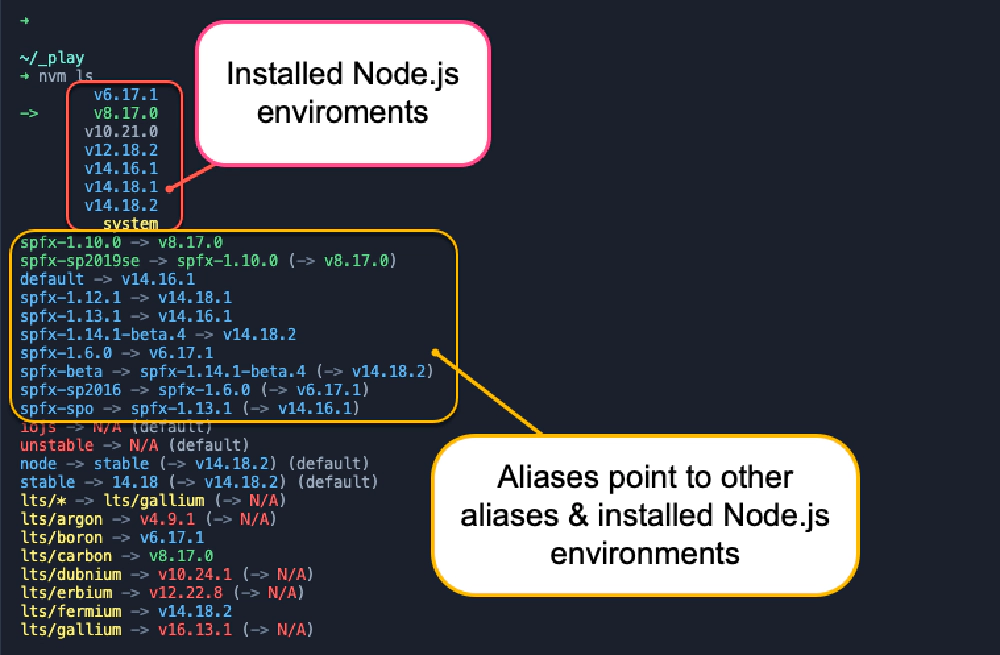
Developer environment supporting all SPFx SharePoint deployment options
With the aliases I set up, I don’t have to keep track of the Node.js version where I installed my set up for a particular environment. Rather, I can jump to a specific SPFx version by executing the following:
nvm use spfx-sp2016
That works for SharePoint Server 2016 with Feature Pack 2… but I can jump to my SharePoint Server 2019, SharePoint Server SE, SharePoint Online, or even the latest SPFx betas just as easily with:
nvm use spfx-sp2019se
nvm use spfx-spo
nvm use spfx-beta
Pretty cool, right? OK, let’s see how to do this:
☝ Assumption: You've Installed NVM
For the remainder of this article, I’m going to assume you’ve installed NVM on your development environment to manage multiple environments. If you went with the virtual machine option, then the installation story is no different than what I explained in my definitive guides linked to above.
SharePoint Framework development for SharePoint Server 2016 with Feature Pack 2
Let’s start with SharePoint Server 2016 with Feature Pack 2 (SP2016). As I covered in my Definitive guide for developers: SharePoint Framework for SharePoint Server 2016, you know we need the following versions:
- Node.js LTS v6 (v6.17.1)
- npm v4
- Gulp-CLI v2.3.0
- Yeoman v2.0.0 with the yeoman-environment v2.7.0 fix
- Yeoman generator for the SharePoint Framework v1.6.0
SPFx for SP2016 with macOS
Let’s start with the platform I prefer for development: macOS. This one, as you know from my definitive guide on SP2016, requires a post-install fix to address a versioning issue with one of Yeoman’s dependencies.
Here’s the script I use to install my environment… the bullet list that follows explains each step:
# (step 1) install node v6 (LTS) > aka: v6.17.1
nvm install lts/boron

# (step 2) install spfx tools & dependencies
npm install npm@4 --global
npm install [email protected] [email protected] @microsoft/[email protected] --global

# (step 3) create aliases
nvm alias spfx-1.6.0 v6.17.1
nvm alias spfx-sp2016 spfx-1.6.0

# (step 4) fix yeoman-environment issue
# ... install yeoman-environment v2.7.0 that works with Node.js LTS v6
npm install [email protected] --global

# ... delete the yeoman-environment package installed by yeoman as a dependency
rm -rf ~/.nvm/versions/node/v6.17.1/lib/node_modules/yo/node_modules/yeoman-environment
Use NVM to install the Node.js LTS v6 version. That release goes by the name of Boron which I’m using in the install as I don’t need to keep track of which version that is. This will always be the most current LTS version for v6.
Install all the tools you need for SPFx development globally, including the Gulp-CLI, Yeoman, & the SPFx generator. Notice I’m explicitly setting the versions I want installed… that’s very important!
Finally, while not necessary, I like to set up aliases. My general practice is to create two of these.
- One is for the specific version of SPFx that’s installed that points to the Node.js version. In this case, we installed SPFx v1.6.0 in the Node.js v6.17.1 environment installed in the first step.
- The second one is an alias for the environment that points to the SPFx version. This is what I normally use so I don’t have to keep track of the installed versions.
As you know from my SP2016 definitive guide post, Yeoman’s v2.0.0 install includes a reference to a more current version of the yeoman-environment package that won’t work with Node.js LTS v6. So, I have to fix this by first installing a specific version of yeoman-environment that will work & then delete the installed version Yeoman installed.
SPFx for SP2016 with Windows
What about Windows? The steps are similar, but the Windows port of NVM has a few limitations. For instance, you can’t specify the version as its LTS code name, nor can you create aliases, and after installing a new Node version, you have to use it.
Here’s the script I use to install my environment… the bullet list that follows explains each step:
# (step 1) install node v6 (LTS) > aka: v6.17.1
nvm install 6.17.1
nvm use 6.17.1

# (step 2) install spfx tools & dependencies
npm install npm@4 --global
npm install [email protected] [email protected] @microsoft/[email protected] --global

# (step 3) fix yeoman-environment issue
# ... install yeoman-environment v2.7.0 that works with Node.js LTS v6
npm install [email protected] --global

# ... delete the yeoman-environment package installed by yeoman as a dependency
del %USERPROFILE%\AppData\Roaming\nvm\v6.17.1\node_modules\yo\node_modules\yeoman-environment /f
SharePoint Framework development for SharePoint Server 2019 & Subscription Edition (SE)
Now let’s look at SharePoint Server 2019 (SP2019) & SharePoint Server Subscription Edition (SPSE). These two versions have the exact same requirements in terms of versions needed. As I covered in my Definitive guide for developers: SharePoint Framework for SharePoint Server 2019, you know we need the following versions:
- Node.js LTS v8 (v8.17.0)
- Gulp-CLI v2.3.0
- Yeoman v3.1.1
- Yeoman generator for the SharePoint Framework v1.10.0
SPFx for SP2019 & SPSE with macOS
Here’s the script I use to install my environment… the bullet list that follows explains each step & they match the steps for the SP2016 script above. The only differences are the versions listed and we don’t need to fixup the Yeoman install:
# (step 1) install node v8 (LTS) > aka: v8.17.0
nvm install lts/carbon

# (step 2) install spfx tools & dependencies
npm install [email protected] yo@3 @microsoft/[email protected] --global

# (step 3) create aliases
nvm alias spfx-1.10.0 v8.17.0
nvm alias spfx-sp2019se spfx-1.10.0
SPFx for SP2019 & SPSE with Windows
Here’s the script I use to install my environment… the bullet list that follows explains each step:
# (step 1) install node v6 (LTS) > aka: v6.17.1
nvm install 8.17.0
nvm use 8.17.0

# (step 2) install spfx tools & dependencies
npm install [email protected] yo@3 @microsoft/[email protected] --global
SharePoint Framework development for SharePoint Online
Now let’s look at SharePoint Online (SPO). For this environment, we want to use the latest and greatest tools available to us. At this time, that’s the following:
- Node.js LTS v14 (v14.18.2)
- Gulp-CLI v2.3.0
- Yeoman v4
- Yeoman generator for the SharePoint Framework v1.14
SPFx for SPO with macOS
Here’s the script I use to install my environment… the bullet list that follows explains each step & they match the steps for the SP2016 script above. The only differences are the versions listed and we don’t need to fixup the Yeoman install:
# (step 1) install node v14 (LTS) > aka: v14.18.2
nvm install lts/fermium

# (step 2) install spfx tools & dependencies
npm install [email protected] yo@4 @microsoft/generator-sharepoint@latest --global

# (step 3) create aliases
nvm alias spfx-1.14 lts/fermium
nvm alias spfx-spo spfx-1.14
SPFx for SPO with Windows
Here’s the script I use to install my environment… the bullet list that follows explains each step:
# (step 1) install node v6 (LTS) > aka: v14.18.2
nvm install 14.18.2
nvm use 14.18.2

# (step 2) install spfx tools & dependencies
npm install [email protected] yo@4 @microsoft/generator-sharepoint@latest --global
Try out SharePoint Framework betas
Last but not least, I live to have a beta environment as well. It’s nice to see what’s coming or provide feedback to the team before an official release for the public betas they share. For this, you’ve got to watch the release notes for changes. At this time, the latest beta set up is:
- Node.js LTS v14
- Gulp-CLI v2.3.0
- Yeoman v4
- Yeoman generator for the SharePoint Framework v1.14.0 beta 4
One difference is the Node.js version. I can’t use the same one that I used for the SPO environment, so I need to pick another one. So in this case, I’ll pick a Node version that’s close to the latest version, and reference it by it’s version number instead of it’s codename.
SPFx betas for SPO with macOS
Here’s the script I use to install my environment… the bullet list that follows explains each step & they match the steps for the SP2016 script above:
# (step 1) install node (use latest supported by spfx beta)
nvm install v14.18.1

# (step 2) install SPFx beta dev dependencies
npm install [email protected] yo@4 @microsoft/generator-sharepoint@next --global

# (step 3) create aliases
nvm alias spfx-1.14.0-beta.4 v14.18.1
nvm alias spfx-beta spfx-1.14.0-beta.4
SPFx betas for SPO with Windows
Here’s the script I use to install my environment… the bullet list that follows explains each step:
# (step 1) install node v6 (LTS) > aka: v14.18.1
nvm install 14.18.1
nvm use 14.18.1

# (step 2) install spfx tools & dependencies
npm install [email protected] yo@4 @microsoft/generator-sharepoint@next --global
Conclusion
This entire process usually takes me less than 5 minutes to set up on a brand new workstation. Feel free to use these scripts and modify them to include any other tools you like to have in your SPFx development environment.
For instance, maybe you want the CLI for Microsoft 365 also installed in each version… that comes in quite handy at times. To do that, just add another install line to step 2 to each environment above.
What do you think? Do you have feedback on this process? Use the links below to share this post or start a discussion on Twitter!
Are you ready to learn the SharePoint Framework? Check out our on-demand video course with over 30 hours of demos, explanation and downloadable code: Mastering the SharePoint Framework!
Start with the FREE Starter bundle that includes three (3) chapters including a walk-through of setting up your developer environment to start creating SharePoint Framework components.
Once you start working, jump to the Fundamentals bundle to learn the basics and start creating SharePoint Framework components. The Ultimate bundle will make you a master at the SharePoint Framework with automated testing, continuous monitoring, implement CI/CD practices, and learn other advanced techniques.
The Ultimate bundle includes the Fundamentals bundle and grants you access to our live monthly office hours meetings as well as access to our student-only mastermind group.

Microsoft MVP, Full-Stack Developer & Chief Course Artisan - Voitanos LLC.
Andrew Connell is a full stack developer who focuses on Microsoft Azure & Microsoft 365. He’s a 20+ year recipient of Microsoft’s MVP award and has helped thousands of developers through the various courses he’s authored & taught. Whether it’s an introduction to the entire ecosystem, or a deep dive into a specific software, his resources, tools, and support help web developers become experts in the Microsoft 365 ecosystem, so they can become irreplaceable in their organization.
