This Post Is Part of a Four-Part Series on Using Angular in SharePoint Framework Projects
This four-part blog post series covers the challenges developers face trying to incorporate modern Angular apps in SharePoint Framework projects, two approaches to incorporating Angular projects in SPFx project, and finishes off with the ‘good, bad & the ugly’ review.
You can get all four parts of the series here: Using Angular Elements in SharePoint Framework projects
Check out our Mastering the SharePoint Framework course that contains a chapter on using Angular Elements in SharePoint Framework projects including step-by-step demonstrations on how to make this work using the latest version of Angular.
In my last post, I talked about using Angular Elements in SharePoint Framework projects. When doing this, you have two options on how you will implement this and in this post, I will talk about doing it in one big project that includes everything. In tomorrow’s post, I’ll show you a much better option that uses two projects.
So, you want to use Angular Elements in your SharePoint Framework projects? Sweet! It would seem that you want to start with a SharePoint Framework project and create your Angular Elements-based application in that project, right? Maybe at first, but I hope to show you there is a downside to this approach.
The first of two options is to put everything into one big project. You create an SPFx project and add all the necessary Angular bits to it. Then you create your Angular app and reference it within your SharePoint project. Once you do that, you can leverage it in your web part like this:
// polyfill for ES5 code as doesn't include native implementation for customElements
import '@webcomponents/custom-elements/src/native-shim';
// polyfill for browsers that don't support shadowDom & customElements (IE & Edge)
import '@webcomponents/webcomponentsjs/bundles/webcomponents-sd-ce';
// polyfill required when using JIT compilation (not required for AOT)
import 'core-js/es7/reflect';

// required when using JIT compilation (not required for AOT)
import { platformBrowserDynamic } from '@angular/platform-browser-dynamic';
// angular elements application
import { AppModule } from './app/app.module';

export default class HelloWorldWebPart extends BaseClientSideWebPart<IHelloWorldWebPartProps> {
  public render(): void {
    platformBrowserDynamic().bootstrapModule(AppModule, { ngZone: 'noop' }).then(() => {
      this.domElement.innerHTML =
        `<app-hello-world message="${this.properties.description}"></app-hello-world>`;

      const element = this.domElement.getElementsByTagName('app-hello-world')[0];
      element.addEventListener('onElementButtonClick', (event: any) => {
        alert(event.detail);
      });
    });
  }
}
Let’s unpack this code above:
- notice the first three lines are importing polyfills:
- @webcomponents/custom-elements/src/native-shim: ES5 applications don’t include a native implementation for custom elements so we need to polyfill it (because SPFx projects are currently built for ES5)
- @webcomponents/webcomponentsjs/bundles/webcomponents-sd-ce: Polyfill to add the web components shadow DOM and custom elements specifications to browsers who haven’t finished implementing them or who haven’t realized what the rest of the world is doing (I’m looking at you Edge!)
- core-js/es7/reflect: Polyfill required by Angular when using JIT compilation. You don’t have this problem when you do AOT compilation, something I’ll touch on later in this post.
- render()
- Within this method, we’re having to use the Angular platformBrowserDynamic() object to manually compile and load our application because we’re forced into using JIT compilation. Again, I’ll address this topic later in the post.
- After adding the custom element’s HTML tag to the page…
- Get a reference to it and add an event listener to the custom event onElementButtonClick emitted from our custom element.
When you see my next post for the two-project option, you’ll see how this could be much simpler.
Configure the SPFx Project to Build Angular
Before this can work, there are two things you need to do. First, you need to configure your SPFx project to support Angular v6. How do you do this? Do the following three things:
Add necessary Angular packages to the project (both those needed for production & development to build)
// in addition to the SPFx packages, you need the following
"dependencies": {
  "@angular/common": "6.1.3",
  "@angular/compiler": "6.1.3",
  "@angular/core": "6.1.3",
  "@angular/elements": "6.1.3",
  "@angular/platform-browser": "6.1.3",
  "@angular/platform-browser-dynamic": "6.1.3",
  "@webcomponents/custom-elements": "1.2.0",
  "@webcomponents/webcomponentsjs": "2.1.1",
  "core-js": "2.5.7",
  "rxjs": "6.2.2",
  "zone.js": "0.8.26"
},
"devDependencies": {
  "uglifyjs-webpack-plugin": "1.3.0",
  "webpack-bundle-analyzer": "2.13.1"
}
Modify the gulpfile.js to account for some special build stuff steps:
// add the following before the existing line: build.initialize(gulp);

const webpack = require('webpack');
const path = require('path');
const UglifyJSPlugin = require('uglifyjs-webpack-plugin');
const bundleAnalyzer = require('webpack-bundle-analyzer');

build.configureWebpack.mergeConfig({
  additionalConfiguration: (generatedConfiguration) => {
    const lastDirName = path.basename(__dirname);
    const dropPath = path.join(__dirname, 'temp', 'stats');
    generatedConfiguration.plugins.push(
      new bundleAnalyzer.BundleAnalyzerPlugin({
        openAnalyzer: false,
        analyzerMode: 'static',
        reportFilename: path.join(dropPath, `${lastDirName}.stats.html`),
        generateStatsFile: true,
        statsFilename: path.join(dropPath, `${lastDirName}.stats.json`),
        logLevel: 'error'
      })
    );

    const contextPlugin = new webpack.ContextReplacementPlugin(/\@angular(\\|\/)core(\\|\/)fesm5/,
      path.join(__dirname, './client')
    );
    generatedConfiguration.plugins.push(contextPlugin);

    for (let i = 0; i < generatedConfiguration.plugins.length; i++) {
      const p = generatedConfiguration.plugins[i];
      if (p.options && p.options.mangle) {
        generatedConfiguration
          .plugins
          .splice(i, 1, new UglifyJSPlugin({ uglifyOptions: { mangle: true } }));
        break;
      }
    }

    return generatedConfiguration;
  }
});
Update the TypeScript project file tsconfig.json to include the “emitDecoratorMetadata”: true property.
These steps will set up your project to include the necessary Angular libraries and configure the SPFx build process to include Angular in the build.
Use Angular Elements to Bootstrap your Angular app as a Custom Element
The second step is to create your custom element using Angular Elements. To do this, create it like you’d create any other Angular v6 based application. But, when it comes to bootstrapping it, your root AppModule will look a bit different. This is where Angular Elements comes into play.
Assuming your custom element is called AppComponent (as I showed in the first post, your root app module will look like this:
import { BrowserModule } from '@angular/platform-browser';
import { NgModule, Injector } from '@angular/core';
import { createCustomElement } from '@angular/elements';
import { AppComponent } from './app.component';

@NgModule({
  declarations: [ AppComponent ],
  imports: [ BrowserModule ],
  entryComponents: [ AppComponent ]
})
export class AppModule {
  constructor(private injector: Injector) {}

  public ngDoBootstrap() {
    if (!customElements.get('app-hello-world')) {
      const AppElement = createCustomElement(AppComponent, { injector: this.injector });
      customElements.define('app-hello-world', AppElement);
    }
  }
}
Notice the addition of the ngDoBootstrap() method. This will imperatively bootstrap the custom element when the script file loads in the browser. Normally this is done by the @NgModule.bootstrap property, but as you can see we removed it in the case of Angular Elements.
When you test your project, you’ll notice it appears to get hung at one point when you get to the webpack step… just be patient. Angular v6 uses webpack 4 which is much faster than webpack 3 which your SPFx project is using, so it will take a moment to finish the entire build and bundling process. But when it’s finished, you’ll see it work in the local workbench!
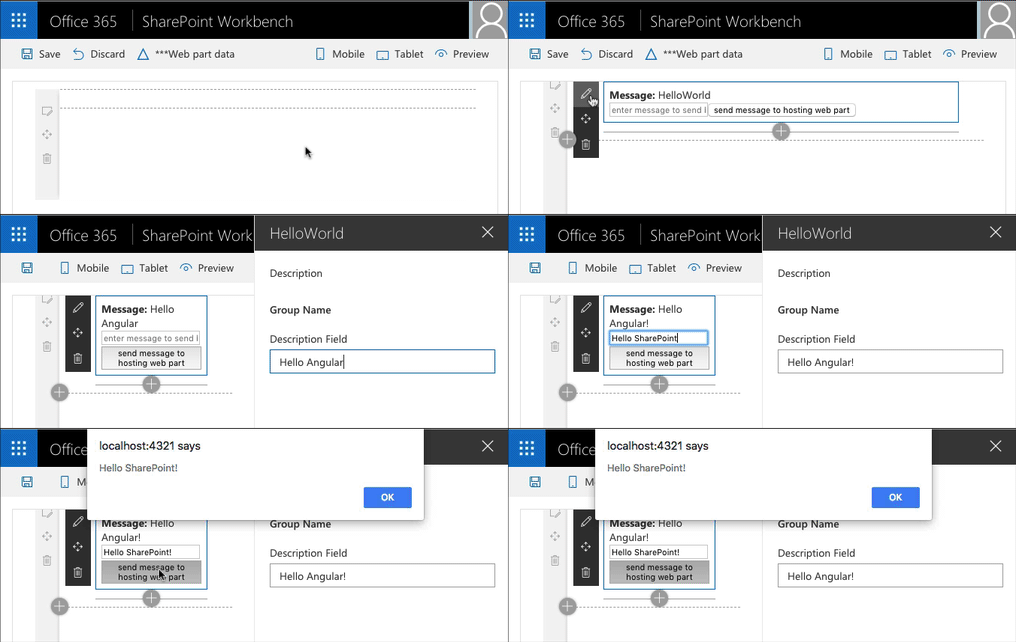
Notice how we’re sending a value into the custom element by saying “Hello Angular!” and having the custom element talk back to SharePoint by raising an event saying “Hello SharePoint!”:

Working Angular v6 project hosted in SPFx
Angular Elements (Angular v6) app hosted in a SPFx project
But, There’s a Catch
Actually, two big catches…
- You can’t use the Angular CLI to create, run, debug, test and build your project; everything is done in the SPFx project and not in an Angular project.
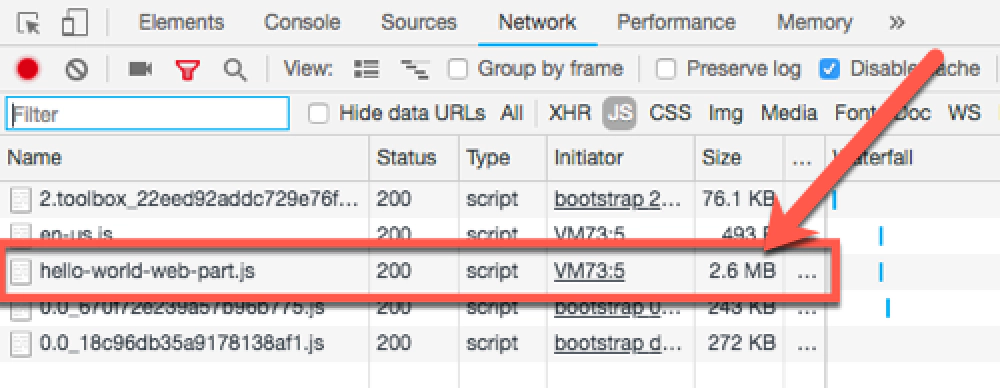
- The resulting payload is huge. In this very simple example, I can’t get it down below 2.6MB (518kB gzipped)! That’s way too big for a client application.

One project payload size
One big project results in a huge bundle
Why is it so big? Modern Angular (v5+) has a concept of ahead-of-time (AOT) compilation. Angular contains a compiler to build your application in pure JavaScript from. This compiler is part of the Angular library. In addition, it performs tree shaking which strips out all the parts of Angular that your application doesn’t use. These two processes dramatically shrink the size of the Angular library that is included in your custom element.
However, in Angular v6, AOT was rewritten as a webpack v4 plugin and that plugin API differs from webpack v3. SPFx is still webpack v3 with no timetable on when they will update the build process to webpack v4 primarily because their build process is used by many teams so it’s not a simple change that only impacts the SPFx engineering team.
So, this means if you want to use one big project, at least for the foreseeable future, you can expect to be dealing with some excessively large bundles for your SPFx project.
My Opinion: One Project is a Bad Approach
Because of these two drawbacks, I don’t recommend this approach. First, the side of the payload is way too big for a web application. The entire payload of a web page shouldn’t be 2.7MB, much less a single component on it.
The other reason I don’t like it is that you can’t use the Angular CLI. I believe it’s a safe assumption that developers who want to use Angular in SPFx projects are existing Angular developers. Those developers are already using the Angular CLI because it dramatically simplifies all the ceremony of creating, configuring, testing, debugging, building and upgrading an Angular project. Using this one-project approach, you have to leave the Angular CLI behind and that’s a pretty steep cost to ask.
Because of this, I recommend using the two-project approach which I’ll show you in my next post. In that approach, not only can you continue to use the Angular CLI, but the same 2.7MB bundle I show above is slashed by 88% down to 328kB (125kB gzipped)!
This Post Is Part of a Four-Part Series on Using Angular in SharePoint Framework Projects
This four-part blog post series covers the challenges developers face trying to incorporate modern Angular apps in SharePoint Framework projects, two approaches to incorporating Angular projects in SPFx project, and finishes off with the ‘good, bad & the ugly’ review.
You can get all four parts of the series here: Using Angular Elements in SharePoint Framework projects
Check out our Mastering the SharePoint Framework course that contains a chapter on using Angular Elements in SharePoint Framework projects including step-by-step demonstrations on how to make this work using the latest version of Angular.
Download Article Resources
Want the resources for this article? Enter your email and we'll send you the download link.
Microsoft MVP, Full-Stack Developer & Chief Course Artisan - Voitanos LLC.
Andrew Connell is a full stack developer who focuses on Microsoft Azure & Microsoft 365. He’s a 20+ year recipient of Microsoft’s MVP award and has helped thousands of developers through the various courses he’s authored & taught. Whether it’s an introduction to the entire ecosystem, or a deep dive into a specific software, his resources, tools, and support help web developers become experts in the Microsoft 365 ecosystem, so they can become irreplaceable in their organization.


