In my last post, Securing an Azure Function App with Entra ID - Works with SharePoint Framework!, I showed how you can secure a REST API deployed as an Azure Function App using Microsoft Entra ID. This comes in quite handy when you want to secure some custom server-side business logic that’s called from a SharePoint Framework ( SPFx) client-side solution.
The SPFx docs show how to use APIs with permissions to the Microsoft Graph… permissions like Users.Read or Calendars.Read. Other docs show how to connect to custom services using the ever-present user_impersonation permission that’s on every AzureAD app.
But what if you want to create your own permissions for your own service?
This post will explain how to add custom permissions to the AzureAD application that is used to secure your Azure Function.
In my course, Mastering the SharePoint Framework, I deploy a custom service that allows users with the correct permissions request a list of and write to, a collection of NASA Apollo missions. Ideally, I’d like to give admins the ability to grant one or both permissions to their tenant: Missions.Read and Missions.Write. Then in my service, I’d check what permissions were included in the OAuth access token to see if the caller had permissions to do the operation they were trying to perform.
Overview: Leveraging Custom Permissions in Entra ID Applications
In order to implement and leverage custom permissions in AzureAD applications, there are three things you need to do. One of these is something you do all the time with AzureAD applications, but the other two are more nuanced.
The three things you need to do are:
- Add custom permissions to AzureAD application
- Grant caller the new permission(s)
- Incorporate the permission into the service’s codebase
Let’s look at each one of these…
(1) Adding Custom Permissions to AzureAD Applications
To add custom permissions to an AzureAD application, you have to modify the application’s manifest. This involves hand-editing a JSON file in the Microsoft Entra ID (formerly Microsoft Entra ID) Admin Center.
Head over to the new Entra ID Admin Center, sign in & then select Microsoft Entra ID from the navigation.
In the navigation, under the Manage section, select App registrations. You may have to click a button to see a list of all your applications.
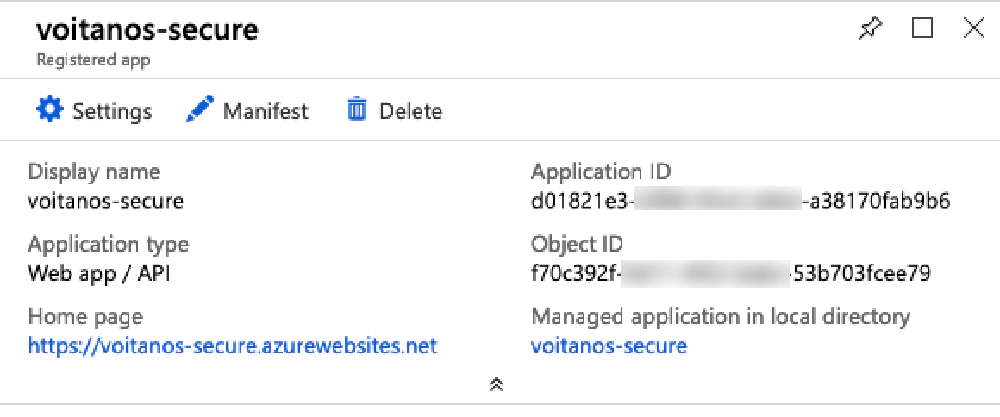
Select the AzureAD application that is tied to your Azure Function App… the one I showed you how to create in the last post.

Entra ID app configuration
From the app’s page, select the Manifest link in the toolbar. This will open the Edit manifest blade. Within the block of JSON that represents the manifest, find the collection oauth2Permissions.
You should find one permission, as shown in this snippet:
"oauth2Permissions": [
  {
    "adminConsentDescription": "Allow the application to access voitanos-secure on behalf of the signed-in user.",
    "adminConsentDisplayName": "Access voitanos-secure",
    "id": "76823b8a-c687-4766-880d-0724695e6e4c",
    "isEnabled": true,
    "type": "User",
    "userConsentDescription": "Allow the application to access voitanos-secure on your behalf.",
    "userConsentDisplayName": "Access voitanos-secure",
    "value": "user_impersonation"
  }
]
I’m going to add two new permissions, one for the Mission.Read and another for Mission.Write:
AzureAD Application Manifest with Custom Permissions
"oauth2Permissions": [
  {
    "adminConsentDescription": "Read mission(s) to the service.",
    "adminConsentDisplayName": "Get mission(s)",
    "id": "8bd02799-e83e-4274-ab78-0c74f8d68b29",
    "isEnabled": true,
    "type": "User",
    "userConsentDescription": "Write mission(s) to the service.",
    "userConsentDisplayName": "Write mission(s)",
    "value": "Mission.Write"
  },
  {
    "adminConsentDescription": "Read mission(s) from the service.",
    "adminConsentDisplayName": "Get mission(s)",
    "id": "9308dd64-6a90-4278-8c91-83be66551511",
    "isEnabled": true,
    "type": "User",
    "userConsentDescription": "Read mission(s) from the service.",
    "userConsentDisplayName": "Get mission(s)",
    "value": "Mission.Read"
  },
  {
    "adminConsentDescription": "Allow the application to access voitanos-secure on behalf of the signed-in user.",
    "adminConsentDisplayName": "Access voitanos-secure",
    "id": "76823b8a-c687-4766-880d-0724695e6e4c",
    "isEnabled": true,
    "type": "User",
    "userConsentDescription": "Allow the application to access voitanos-secure on your behalf.",
    "userConsentDisplayName": "Access voitanos-secure",
    "value": "user_impersonation"
  }
]
Note that both have unique IDs that I had to create. What are those other properties? Strangely enough, the best docs I’ve found on them were from the Microsoft Graph docs: oAuth2Permission resource type.
Make sure to save all your changes!
(2) Grant caller the new permission(s)
This is the easiest of the three steps because it is something you already have to do with calling AzureAD secured services from SPFx. The SPFx docs explain how to do this: MSFT: Connect to Entra ID-secured APIs in SharePoint Framework solutions.
As I explained in my post Consider Avoiding Declarative Permissions with Entra ID Services in SharePoint Framework Projects, I prefer using the Office 365 CLI to grant my permissions. So, to grant my SharePoint Online tenant access to my service with these permissions, I’d just execute the commands:
# start the Office 365 CLI
office365
# >>> make sure you are logged in

# just enough to connect to the endpoint, but not do anything
spo serviceprincipal grant add --resource "voitanos-secure" --scope "user_impersonation"

# get one or many Apollo Missions (HTTP GET)
spo serviceprincipal grant add --resource "voitanos-secure" --scope "Mission.Read"

# create missions (HTTP POST)
spo serviceprincipal grant add --resource "voitanos-secure" --scope "Mission.Write"
@andrewconnell
(3) Incorporate the permission into the service’s codebase
Last step… use these new permissions in your custom REST API codebase! I’m partial to using Node.js & TypeScript for my server-side work, but you can use anything you like.
Let’s get one thing out of the way - our REST API can assume that the call it’s receiving has been validated with proper authentication by Entra ID by the time we get the call. Why? that’s part of the validation that Entra ID + Azure Function App integration that Azure is doing for us.
All we need to do is implement the business logic. To do this, I need to decode that token. The npm package jsonwebtoken is useful for this. In another post, Validating Entra ID Generated OAuth Tokens, I show how you can decode this properly, but for now, this works:
import jwt = require('jsonwebtoken');

const aadKey: string = // aad public key used to sign oauth access token

try {
  const authorizationHeader: string = req.headers.authorization;

  // decode the token using the AzureAD public signing key
  const decodedToken = (jwt.verify(authorizationHeader.replace('Bearer ','')) as any), aadKey);

  const scopes: string = (decodedToken.scp as string)
  // check for read / write ops
  hasMissionReadScope = (scopes.indexOf('Mission.Read') >= 0);
  hasMissionWriteScope = (scopes.indexOf('Mission.Write') >= 0);

  // check if it's specific user
  isUser = (decodedToken.upn.indexOf('[email protected]') !== -1);

  isValidRequest = true;
} catch (err) {
  isValidRequest = false;

  //  <snip> .. throw error responses based on exception from "jsonwebtoken"
}
Notice in this case I’m checking the scp array, which contains the scopes (aka: permissions) that are in the OAuth access token.
I’m also checking the upn which is the ID of the user who initiated the call. Yes… you can tell who the actual user is who initiated the call from SPFx!
This gives me boolean flags I can then use to check in the actual logic and either perform the requested operation, or just throw a permission error:
if (isValidRequest) {
  switch (req.method) {
    case 'GET':
      if (hasMissionReadScope) {
        response = missionId ? getOne(missionId) : getMany();
      } else {
        response = {
          status: HttpStatusCode.Unauthorized,
          body: {
            message: 'Insufficient permissions to retrieve missions. Missing scope Mission.Read.'
          }
        }
      }
      break;
    case 'POST':
      if (hasMissionWriteScope) {
        response = insertOne(req.body);
      } else {
        response = {
          status: HttpStatusCode.Unauthorized,
          body: {
            message: 'Insufficient permissions to write missions. Missing scope Mission.Write.'
          }
        }
      }
      break;

    default:
      response = {
        status: HttpStatusCode.BadRequest,
        body: {
          error: {
            type: 'not_supported',
            message: `Method ${req.method} not supported.`
          }
        }
      };
  }
}

// ensure:
//  - response is of type application/json
//  - CORS configured for calling domain
response.headers = {
  'Content-Type': 'application/json',
  'Access-Control-Allow-Credentials': 'true'
};

context.res = response;
Using this pattern & the support for Entra ID secured REST APIs in SharePoint Online with SPFx, you can easily implement custom services and secure your business logic and data with custom permissions and even lock them down to specific users!

Microsoft MVP, Full-Stack Developer & Chief Course Artisan - Voitanos LLC.
Andrew Connell is a full stack developer who focuses on Microsoft Azure & Microsoft 365. He’s a 21-year recipient of Microsoft’s MVP award and has helped thousands of developers through the various courses he’s authored & taught. Whether it’s an introduction to the entire ecosystem, or a deep dive into a specific software, his resources, tools, and support help web developers become experts in the Microsoft 365 ecosystem, so they can become irreplaceable in their organization.


