The Microsoft 365 Agents Toolkit currently offers limited project templates for creating declarative agents. While there’s a single template that uses TypeSpec, it defaults to using an existing public API and doesn’t include an Azure Function project to add a custom API.
In real-world scenarios, you’ll likely need more flexibility and control over your agent’s functionality.
This article will show you how to enhance an existing declarative agent project by adding TypeSpec support to work with Azure Functions, giving you a better understanding of the project structure and build process.
Get the Starter Project Template
Want to skip the step and download my starter project? Jump to the end of the article to get a ZIP of the project.
Understanding the current template limitations
The current Microsoft 365 Agents Toolkit (ATK) includes a declarative agent template that uses TypeSpec, but it’s designed to work with existing hosted APIs, not to create a custom API:
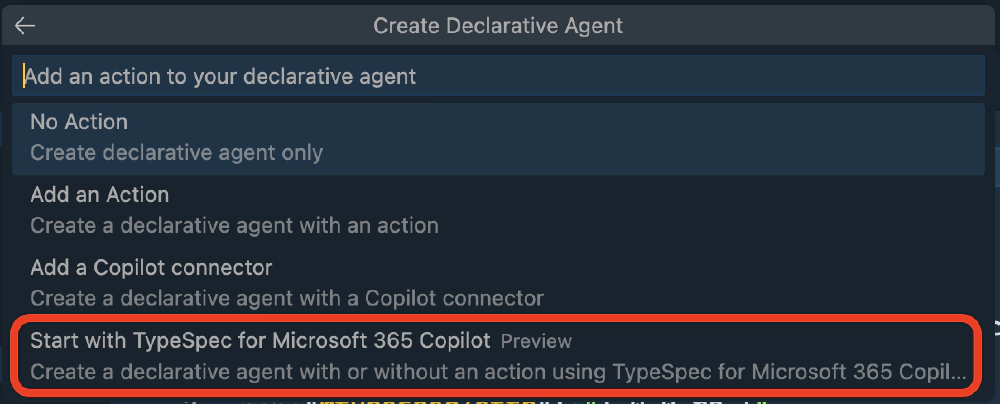
Microsoft 365 Agents Toolkit - Project Template for a Declarative Agent with TypeSpec
This template doesn’t account for the common scenario where you need to create custom APIs alongside your agent. If you need to create a custom API for your declarative agent, you’ll need to:
- Create an Azure Functions project and add the project
- Generate proper API documentation and manifest files
- Maintain consistency between their API specifications and implementation
- Set up a development workflow that supports both agent configuration and API development
The existing template that includes Azure Functions uses traditional JSON manifest files rather than TypeSpec. While functional, this approach lacks the developer experience benefits that TypeSpec provides.
Adding TypeSpec to your Azure Function agent project
To add TypeSpec support to an existing declarative agent project with Azure Functions, you’ll need to modify the project structure and build configuration. This process involves several key steps that will transform your traditional JSON-based configuration into a TypeSpec-powered development workflow.
Create a declarative agent with an Azure Function for the API
Start by creating a new declarative agent in VS Code: Declarative Agent ▶︎ Add an Action ▶︎ Start with a New API ▶︎ Auth Type: None ▶︎ TypeScript ▶︎ [pick a folder for the project] ▶︎ [enter a project name]
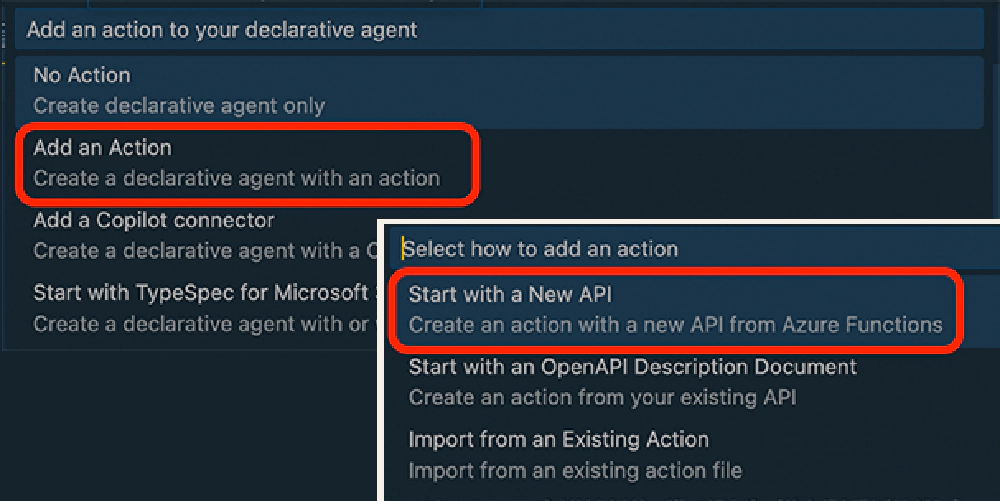
Create a declarative agent with an Azure Function project
Remove existing declarative agent manifest and schema files
Because we’re going to use TypeSpec, let’s start by removing all the JSON and YAML files used to implement a declarative agent. These files will be generated with the TypeSpec files we’ll add.
Make the following changes to the project to remove what will be dynamically generated by TypeSpec:
- Locate and open the app manifest file: ./appPackage/manifest.json
- Delete the
copilotAgentsproperty; this will be created by the M365 Copilot TypeSpec library.
- Delete the
- Delete the following folder: ./appPackage/apiSpecificationFile
- Delete the following files:
- ./appPackage/ai-plugin.json
- ./appPackage/instruction.txt
- ./appPackage/repairDeclarativeAgent.json
Add TypeSpec to the project
Now, you’ll need to install the necessary TypeSpec dependencies and configure the build system to generate the required manifest files.
Start by adding all the TypeSpec packages:
- @typespec/compiler
- @typespec/http
- @typespec/openapi
- @typespec/openapi3
Normally, we’d want the latest version, but the current M365 Copilot library has a tight coupling with the TypeSpec release candidate 1 package versions.
You’ll also want to install the latest version of the Microsoft 365 Copilot TypeSpec library: @microsoft/typespec-m365-copilot. At the time of writing, that’s the release candidate 3.
To simplify things, you can use the following to install everything you need in the project:
npm i @microsoft/[email protected] -DE
npm i @typespec/[email protected] -DE
npm i @typespec/[email protected] -DE
npm i @typespec/[email protected] -DE
npm i @typespec/[email protected] -DE
Next, add a TypeSpec configuration file to the project to define the emitters we want to use as part of the compilation process. Create a new file ./tspconfig.yml and add the following code to it:
emit:
  - "@typespec/openapi3"
  - "@microsoft/typespec-m365-copilot"
options:
  "@typespec/openapi3":
    emitter-output-dir: "{project-root}/appPackage/.generated/specs"
    file-type: yaml # yaml|json
  "@microsoft/typespec-m365-copilot":
    emitter-output-dir: "{project-root}/appPackage/.generated"
    output-file: declarativeAgent.json
    file-type: json
emit: This tells the TypeSpec compiler to use two emitters when it compiles our TypeSpec files.options/@typespec/openapi3: This configures the generation of the OAD file for the custom API endpoint. These settings will save the resulting OAD as YAML in the ./appPackage/.generated/specs folder using a default name.options/@microsoft/typespec-m365-copilot: This configures the generation of the declarative agent manifest file. Like the other emitter, it will be saved in the ./appPackage/.generated folder named declarativeAgent.json.
Configuring the build toolchain
Once you’ve added TypeSpec to your project, you’ll need to configure the build process to generate all the necessary files that the Microsoft 365 Agents Toolkit expects. This includes:
- The declarative agent manifest file
- The API plugin manifest file
- The OpenAPI specification document
- Any additional configuration files required by your Azure Function
The build configuration needs to ensure that changes to your TypeSpec definitions automatically update all dependent files. This creates a single source of truth for your API specification while maintaining compatibility with the existing agent deployment process.
Start by making the following changes to the two project files: ./m365agents.yml and ./m365agents.local.yml
Add an action to install all npm packages used in your Azure Function API endpoint and the other development dependencies, including TypeSpec.
In the
provisionlifecycle, locate the existingteamsApp/createaction, and add the following action immediately after it:- uses: cli/runNpmCommand name: install dependencies with: args: install --no-audit --progress=falseNext, add the following action after the previous one you added to compile your TypeSpec. This action will create the following files:
- Declarative agent manifest (declarativeAgent.json)
- Plugin manifest ([api-namespace]-apiplugin.json)
- Azure Function API Open API Description Doc (OAD) ([api-namespace]-openapi.yaml)
Finally, it will update the app manifest to add the declarative agent
- uses: typeSpec/compile
  with:
    path: ./src/agent/main.tsp
    manifestPath: ./appPackage/manifest.json
    outputDir: ./appPackage/.generated
    typeSpecConfigPath: ./tspconfig.yaml
Update the VS Code configuration
This part of the update is not necessary, but I think it does improve the overall development experience. It’s up to you if you do none, some, or all of the following changes in this section. All of them are completely independent of each other:
Because we’re going to use TypeSpec to generate the various manifest and OAD files for the declarative agent, configure VS Code to not allow the user to edit the generated files using VS Code.
To do this, open the ./.vscode/settings.json file and add the following property to mark all files in the ./appPackage/.generated as read-only:
"files.readonlyInclude": {
  "appPackage/.generated/**/*": true
},
Next, configure VS Code to check if the user has specific VS Code extensions installed. If not, the user will receive a notification to install these extensions. One of these extensions is for TypeSpec, and the other is for the Adaptive Card previewer.
Locate and open the ./.vscode/extensions.json file and add the following extensions to the existing
recommendationsarray:"typespec.typespec-vscode", "teamsdevapp.vscode-adaptive-cards"Finally, update the ./.gitignore file to exclude all the generated files from source control.
Add the following to the end of the .gitignore file:
# TypeSpec generated files
appPackage/.generated
Add support for environment variables in TypeSpec files
Normally, we can add references to environment variables in our code and manifest files using the format ${{ENV_VAR_NAME}} and the ATK will replace environment variables as the last step in the build process when generating files. Unfortunately, this won’t work for TypeSpec files as that syntax will trigger compilation errors. So, we need another approach for now.
I’ve come up with a pattern that, once set up, is easy to maintain. It involves dynamically generating a TypeSpec file, env.tsp, that creates variables set to the values of the environment variables in our project. Then, in your TypeSpec project, just reference the new TypeSpec variables like normal variables.
To implement this, you’ll add a utility script and another action in your ATK project files.
Add a utility script to manage the env.tsp file
A script is used to create an update the env.tsp file. Start by installing the dotenv npm package in your project:
npm i dotenv -DE
Next, create a new file ./scripts/env-to-tsp.ts and add the following code to it:
import * as fs from 'fs';
import * as path from 'path';
import * as dotenv from 'dotenv';

// Get CLI arguments
const command = process.argv[2];        // delete | update
const outputFilePath = process.argv[3]; // typescript file to write
const environment = process.argv[4];    // local|dev|[none]
const envVar = process.argv[5];         // environment variable in env file

// if delete...
if (command === 'delete') {
  if (fs.existsSync(outputFilePath)) {
    fs.unlinkSync(outputFilePath);
    console.log(`Deleted: ${outputFilePath}`);
  }
// else if append...
} else if (command === 'append') {
  // Load environment variables
  dotenv.config({ path: `./env/.env.${environment}` });

  // Ensure output directory exists
  fs.mkdirSync(path.dirname(outputFilePath), { recursive: true });

  // Get value from env
  const value = process.env[envVar];

  if (value === undefined) {
    throw new Error(`Environment variable ${envVar} is not defined in .env.${environment}`);
  }

  // Append to file
  const outputLine = `alias ${envVar} = "${value}";\n`;
  fs.appendFileSync(outputFilePath, outputLine);
  console.log(`Wrote: ${outputFilePath}`);
}
Update the ATK project files to manage the env.tsp file
Now, update the project build files to create and update the env.tsp file.
Locate and open the two project files: ./m365agents.yml and ./m365agents.local.yml
In the
provisionlifecycle, add the following action between thecli/runNpmCommandandtypeSpec/compileactions you added previously. This will delete an existing file and add an entry for each environment variable to the env.tsp file.This sample adds a single variable,
OPENAPI_SERVER_URL, to the file. If you have more, duplicate this last line and update the environment variable.- uses: script name: Create envvar TypeSpec with: run: node ./dist/scripts/env-to-tsp.js delete ./src/agent/env.tsp; node ./dist/scripts/env-to-tsp.js append ./src/agent/env.tsp local OPENAPI_SERVER_URL;[optional] - Since the generated env.tsp file is always rebuilt on every build, I like to exclude this from source control. This is entirely optional, but I’d consider it a good idea. To do this, add the following to your ./.gitignore file:
# utils
./src/agent/env.tsp
[optional] - Also, for the same reason it’s dynamically generated, I also configure VS Code to mark the env.tsp file read-only. While I’m at it, I’ll do the same to the files generated by compiling the TypeSpec files. Similar to the last step, this is entirely optional, but if you want to mark these files as read only like I do, open the ./.vscode/settings.json file and add these generated files to the
files.readonlyincludeobject:{ .. "files.readonlyInclude": { "appPackage/.generated/**/*": true, "src/agent/env.tsp": true }, .. }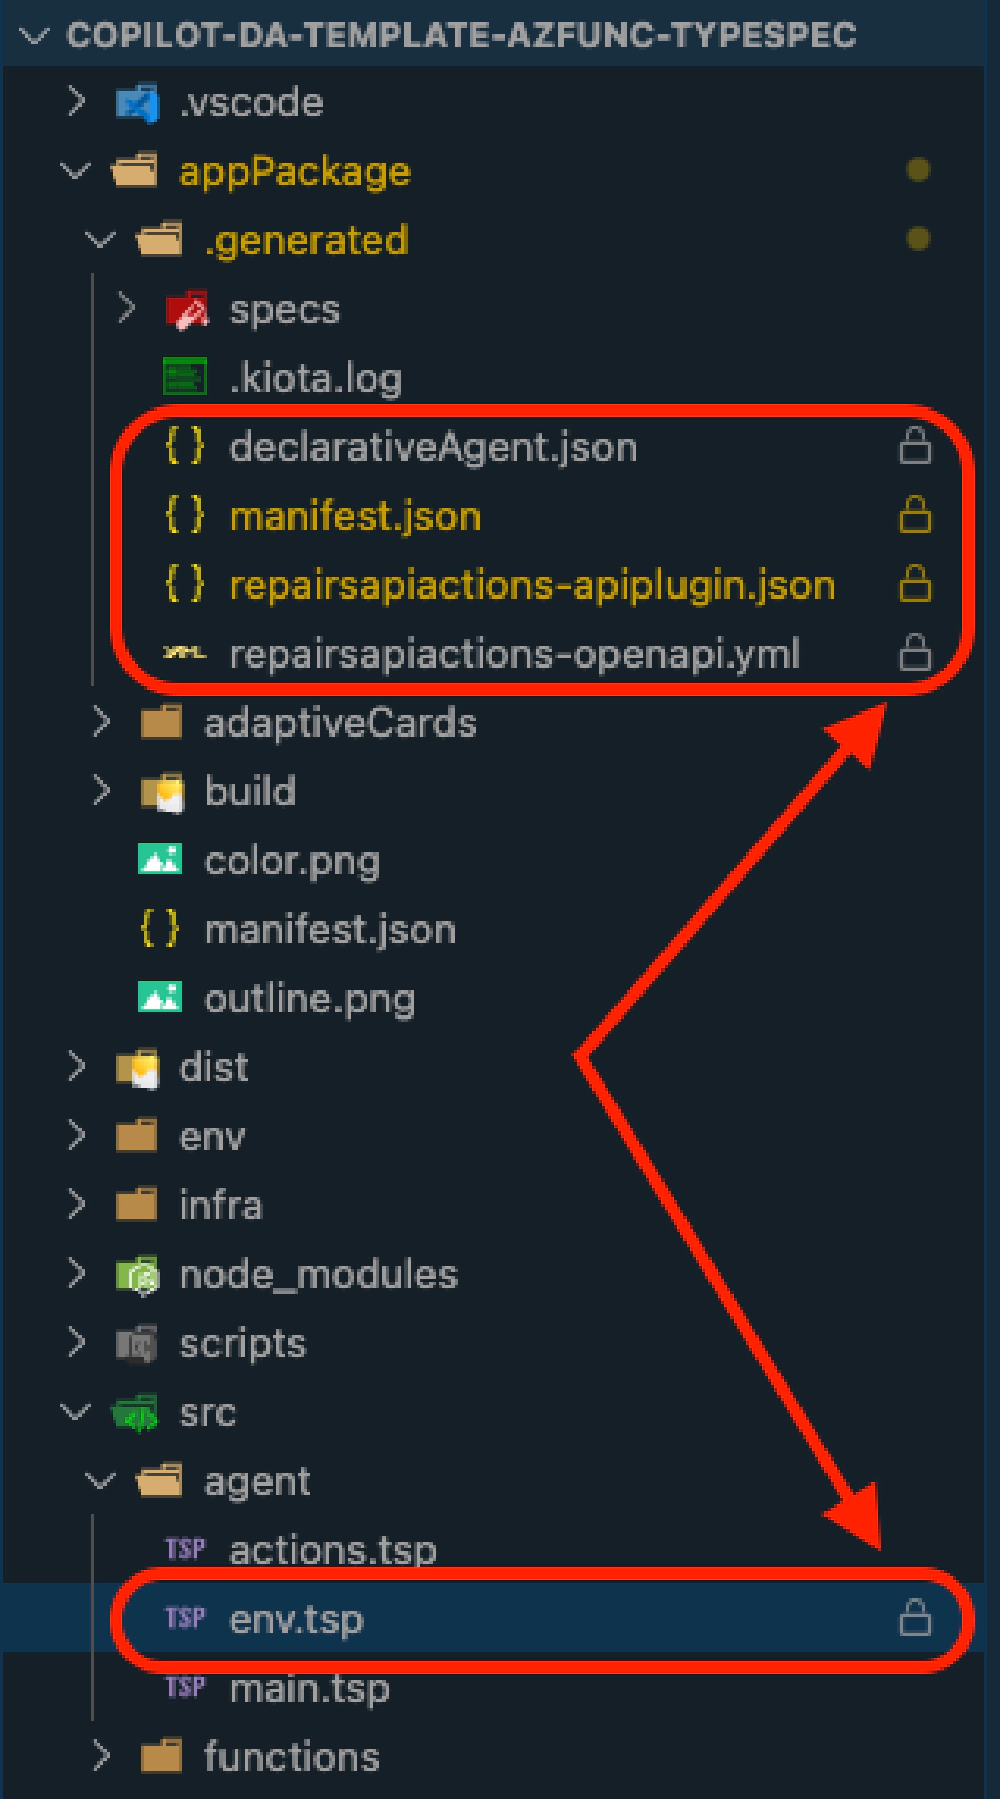
Files marked as readonly in VS Code
At this point, the project is now set up to support TypeSpec, so we can start adding the TypeSpec files to generate the JSON and YAML files for our declarative agent!
Add TypeSpec
Start by creating the entry point for the declarative agent, ./src/agent/main.tsp, and add the following import and using statements:
import "@typespec/http";
import "@typespec/openapi3";
import "@microsoft/typespec-m365-copilot";
using TypeSpec.Http;
using TypeSpec.M365.Copilot.Agents;
using TypeSpec.M365.Copilot.Actions;
TypeScript developers will be familiar with the import statement. The using statements will import the types from a namespace into the current scope. In this case, it imports things like decorators defined in the Microsoft 365 TypeSpec library.
Define the declarative agent
Next, create the declarative agent by specifying the name and description using the @agent decorator:
@agent(
  "BaseDaAzFuncAction",
  "This declarative agent helps you with finding car repair records."
)
Then, set the agent’s instructions and conversation starter, or sample prompt, using two more decorators.
@instructions("""
  You will assist the user in finding car repair records based on
  the information provided by the user. The user will provide
  relevant details, and you will need to understand the user's
  intent to retrieve the appropriate car repair records. You can
  only access and leverage the data from the 'repairPlugin' action.
""")

@conversationStarter(#{
  title: "Repairs Assigned to Karin",
  text: "Show repair records assigned to Karin Blair"
})
Note two syntax elements that might be new to you:
- TypeSpec supports multiline strings when you surround them with triple double quotes, as you see in the
@instructionsdecorator. - When defining an object, as I’m doing with the
@converationStarter, you prefix the object with the hash symbol#.
Because the template I’m creating only has a single API plugin in it and no knowledge (aka capabilities), I don’t have to add any capabilities to it, but I could use a TypeSpec operation. For instance, to add content from a SharePoint site collection, I could add an operation using the following TypeSpec:
op sharepointSite is AgentCapabilities.OneDriveAndSharePoint<TItemsByUrl = [
  {
    url: "https://contoso.sharepoint.com/sites/ProductSupport"
  }
]>;
Add actions (API plugins) to the agent
The project template I started with has a single API endpoint, so I’ll add that to the project. To do this, I’ll put the API’s OAD file and the plugin manifest in a new namespace and its own file.
Start by creating a new file, ./src/agent/actions.tsp, and add the following import and using statements:
import "@typespec/http";
import "@microsoft/typespec-m365-copilot";
import "./env.tsp";

using TypeSpec.Http;
using TypeSpec.M365.Copilot.Actions;
Notice I’m importing the ./src/agents/env.tsp file that I previously configured to get dynamically generated as part of the build process. This contains the routable URL, via a dev tunnel, of our Azure Function project running locally when we’re testing the agent. But our API will be listening on the root of the /api URL, so I’ll create a new variable, or alias, to concatenate two strings together using string interpolation:
alias OPENAPI_SERVER_ENDPOINT = "${OPENAPI_SERVER_URL}/api";
Next, define the plugin manifest by decorating a new namespace and using an object for the full definition of the action:
@service
@server(OPENAPI_SERVER_ENDPOINT)
@actions(RepairsAPI.ACTIONS_METADATA)
namespace RepairsAPI {
  const ACTIONS_METADATA = #{
    nameForHuman: "BaseDaAzFuncAction",
    descriptionForHuman: "Track your repair records",
    descriptionForModel: "Plugin for searching a repair list, you can search by who's assigned to the repair."
  };
}
Add an API endpoint
Within the RepairsAPI namespace, add an operation to not only define the API’s endpoint in the OAD file, but also as an action in our plugin manifest. The API’s endpoint is called via an HTTP GET request with an optional single query string parameter to filter who the repairs are assigned to.
Start by adding the following listRepairsoperation to the RepairsAPI namespace:
@route("/repairs")
@summary("List all repairs")
@doc("Returns a list of repairs with their details and images")
@get op listRepairs(
    @doc("Filter repairs by who they're assigned to")
    @query assignedTo?: string
  ):{
    @statusCode statusCode: 200;
    @body results: {..}[]
  };
)
Now, update the response by first describing it with a new @returnsDoc decorator and then update the response @body by implementing the data type of the results array that’s returned by the endpoint:
/* omitted for brevity */
@returnsDoc("A list of repairs")
@get op listRepairs(/* omitted for brevity */):{
  /* omitted for brevity */
  @body results: {
    @doc("The unique identifier of the repair")
    id?: string;

    @doc("The short summary of the repair")
    title?: string;

    @doc("The detailed description of the repair")
    description?: string;

    @doc("The user who is responsible for the repair")
    assignedTo?: string;

    @doc("The date and time when the repair is scheduled or completed")
    @format("date-time")
    date?: string;

    @doc("The URL of the image of the item to be repaired or the repair process")
    @format("uri")
    image?: string;
  }[]
};
Finally, configure how copilot should use the data returned from the endpoint in the plugin manifest. This is done in the responseSemantics part of the plugin manifest:
- Map the collection of results from the API endpoint to copilot using the
dataPathproperty. - Map which properties on each item should map to the required
titleandsubTitleproperties copilot needs for the summarization. - You can also specify an Adaptive Card to define how you want the results rendered in a copilot response by specifying a
staticTemplateand referencing the path to the card. This syntax expects the path specified to be relative to the project’s ./appManifest folder.
Add the responseSemantics using the @capabilities decorator:
@capabilities(#{
  responseSemantics:#{
    dataPath: "$.results",
    properties:#{
      title: "$.title",
      subTitle: "$.description"
    },
    staticTemplate: #{file: "adaptiveCards/listRepairs.json"}
  }
})
@get op listRepairs /* omitted for brevity */
Lastly, add the Adaptive Card to the project: ./appPackage/adaptiveCards/listRepairs.json:
{
  "type": "AdaptiveCard",
  "$schema": "http://adaptivecards.io/schemas/adaptive-card.json",
  "version": "1.5",
  "body": [
    {
      "type": "Container",
      "$data": "${$root}",
      "items": [
        {
          "type": "TextBlock",
          "text": "id: ${if(id, id, 'N/A')}",
          "wrap": true
        },
        {
          "type": "TextBlock",
          "text": "title: ${if(title, title, 'N/A')}",
          "wrap": true
        },
        {
          "type": "TextBlock",
          "text": "description: ${if(description, description, 'N/A')}",
          "wrap": true
        },
        {
          "type": "TextBlock",
          "text": "assignedTo: ${if(assignedTo, assignedTo, 'N/A')}",
          "wrap": true
        },
        {
          "type": "TextBlock",
          "text": "date: ${if(date, date, 'N/A')}",
          "wrap": true
        },
        {
          "type": "Image",
          "url": "${image}",
          "$when": "${image != null}"
        }
      ]
    }
  ]
}
Furthermore, if you add sample data in a sidecar file (./appManifest/adaptiveCards/listRepairs.data.json), you can use the Adaptive Card Previewer VSCode extension to preview your card:
[
  {
    "id": "1",
    "title": "Repairs",
    "description": "Repairs with their details and images",
    "assignedTo": "Karin",
    "date": "2025-2-20T05:25:43.593Z",
    "image": "https://th.bing.com/th/id/OIP.N64J4jmqmnbQc5dHvTm-QAHaE8"
  }
]
The complete actions.tsp file should look like the following:
import "@typespec/http";
import "@microsoft/typespec-m365-copilot";
import "./env.tsp";

using TypeSpec.Http;
using TypeSpec.M365.Copilot.Actions;

alias OPENAPI_SERVER_ENDPOINT = "${OPENAPI_SERVER_URL}/api";

@service
@server(OPENAPI_SERVER_ENDPOINT)
@actions(RepairsAPI.ACTIONS_METADATA)
namespace RepairsAPI {
  /**
   * Metadata for the Repairs API actions.
   */
  const ACTIONS_METADATA = #{
    nameForHuman: "BaseDaAzFuncAction",
    descriptionForHuman: "Track your repair records",
    descriptionForModel: "Plugin for searching a repair list, you can search by who's assigned to the repair."
  };

  @route("/repairs")
  @summary("List all repairs")
  @doc("Returns a list of repairs with their details and images")
  @returnsDoc("A list of repairs")
  @capabilities(#{
    responseSemantics:#{
      dataPath: "$.results",
      properties:#{
        title: "$.title",
        subTitle: "$.description"
      },
      staticTemplate: #{file: "adaptiveCards/listRepairs.json"}
    }
  })
  @get op listRepairs(
    @doc("Filter repairs by who they're assigned to")
    @query assignedTo?: string
  ):
  {
    @statusCode statusCode: 200;
    @body results: {
      @doc("The unique identifier of the repair")
      id?: string;

      @doc("The short summary of the repair")
      title?: string;

      @doc("The detailed description of the repair")
      description?: string;

      @doc("The user who is responsible for the repair")
      assignedTo?: string;

      @doc("The date and time when the repair is scheduled or completed")
      @format("date-time")
      date?: string;

      @doc("The URL of the image of the item to be repaired or the repair process")
      @format("uri")
      image?: string;
    }[]
  };

}
With the action created, the last step is to add it to the declarative agent.
Go back to the ./src/agents/main.tsp file, add an import statement, and create the plugin manifest entry for the operation:
namespace BaseDaAzFuncAction {
  @service
  @server(OPENAPI_SERVER_ENDPOINT)
  @actions(global.RepairsAPI.ACTIONS_METADATA)
  namespace RepairsAPIActions {
    op listRepairs is global.RepairsAPI.listRepairs;
  }
}
The final main.tsp file should look like the following:
import "@typespec/http";
import "@typespec/openapi3";
import "@microsoft/typespec-m365-copilot";
import "./env.tsp";
import "./actions.tsp";

using TypeSpec.Http;
using TypeSpec.M365.Copilot.Agents;
using TypeSpec.M365.Copilot.Actions;

@agent(
  "BaseDaAzFuncAction",
  "This declarative agent helps you with finding car repair records."
)

@instructions("""
  You will assist the user in finding car repair records based on
  the information provided by the user. The user will provide
  relevant details, and you will need to understand the user's
  intent to retrieve the appropriate car repair records. You can
  only access and leverage the data from the 'repairPlugin' action.
""")

@conversationStarter(#{
  title: "Repairs Assigned to Karin",
  text: "Show repair records assigned to Karin Blair"
})

namespace BaseDaAzFuncAction {
  @service
  @server(OPENAPI_SERVER_ENDPOINT)
  @actions(global.RepairsAPI.ACTIONS_METADATA)
  namespace RepairsAPIActions {
    op listRepairs is global.RepairsAPI.listRepairs;
  }
}
That’s it! The final project structure should look like the following screenshot:
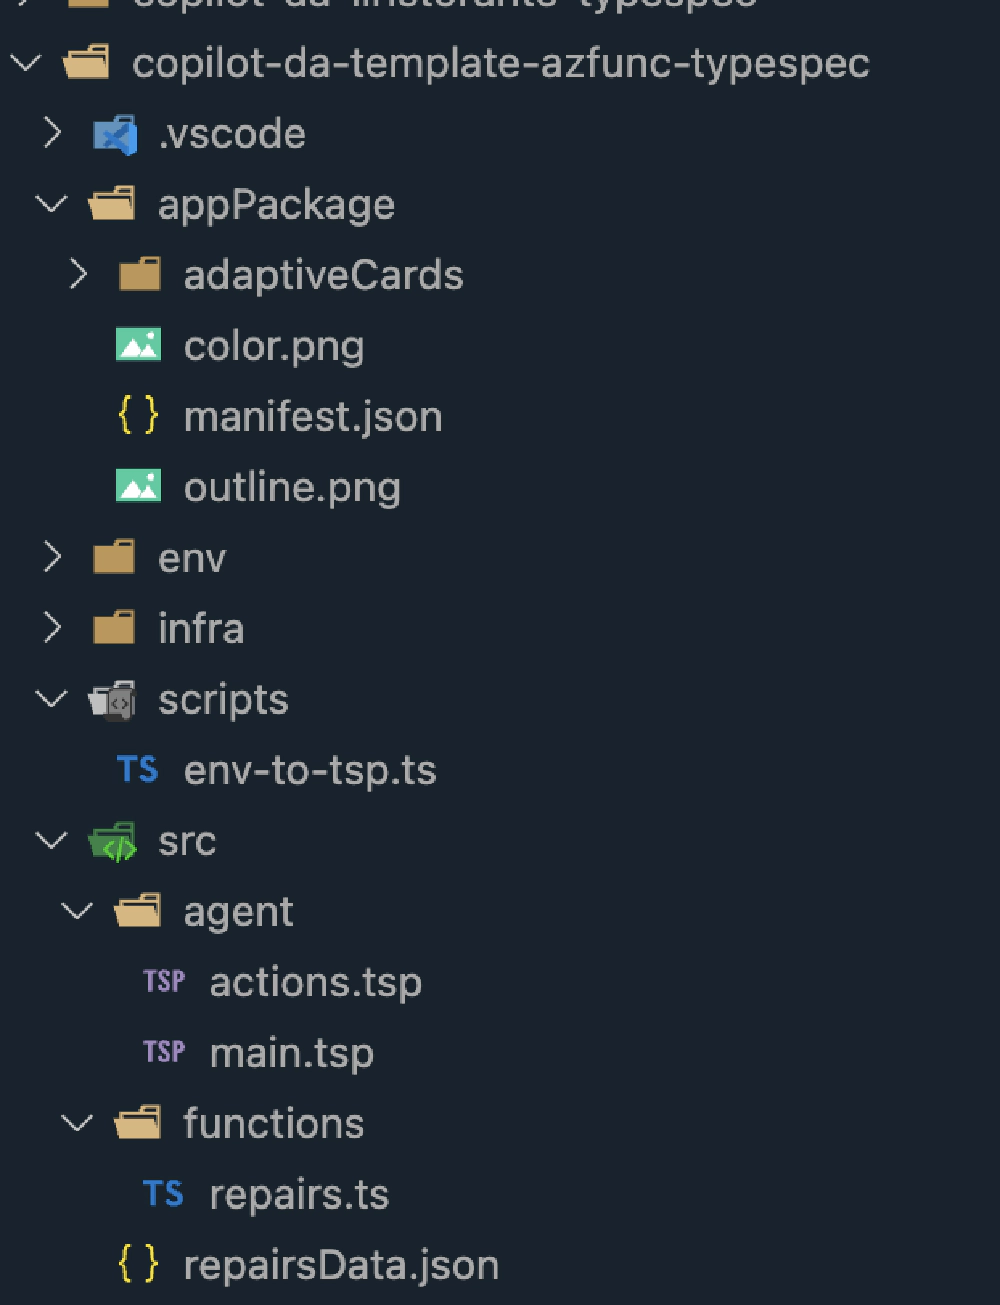
Base Microsoft 365 Copilot declarative agent with Azure Function API base project template
Test the starter template
The proof is to see this in action! Start the test and once everything is built, you’ll see the agent load:
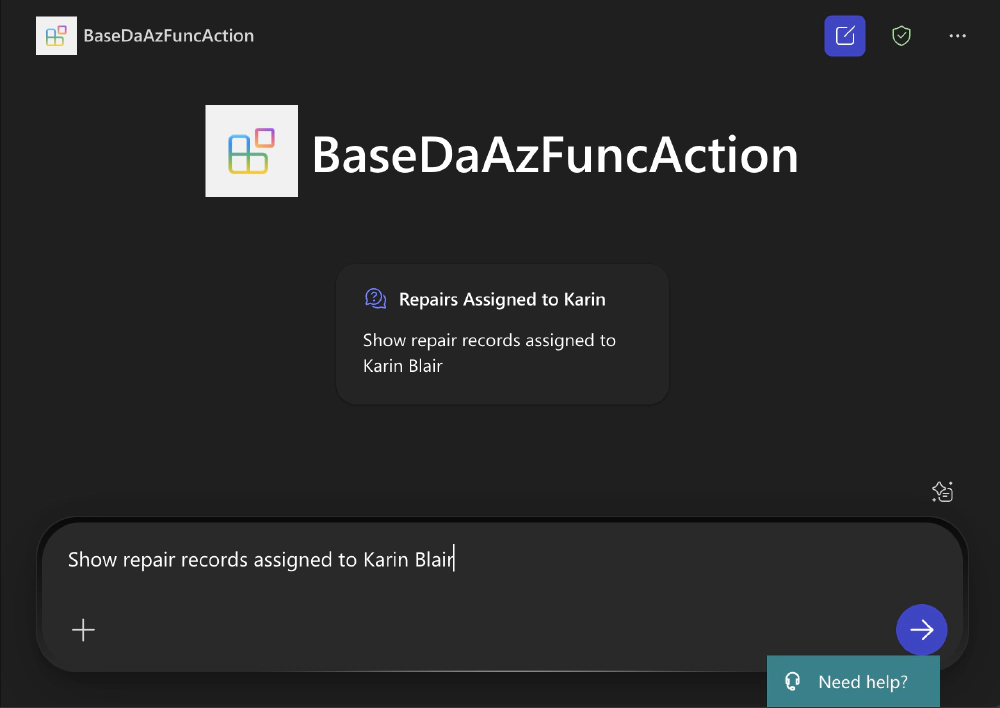
Base Microsoft 365 Copilot declarative agent project template first run experience.
Select the conversation starter and submit the prompt to see the results:
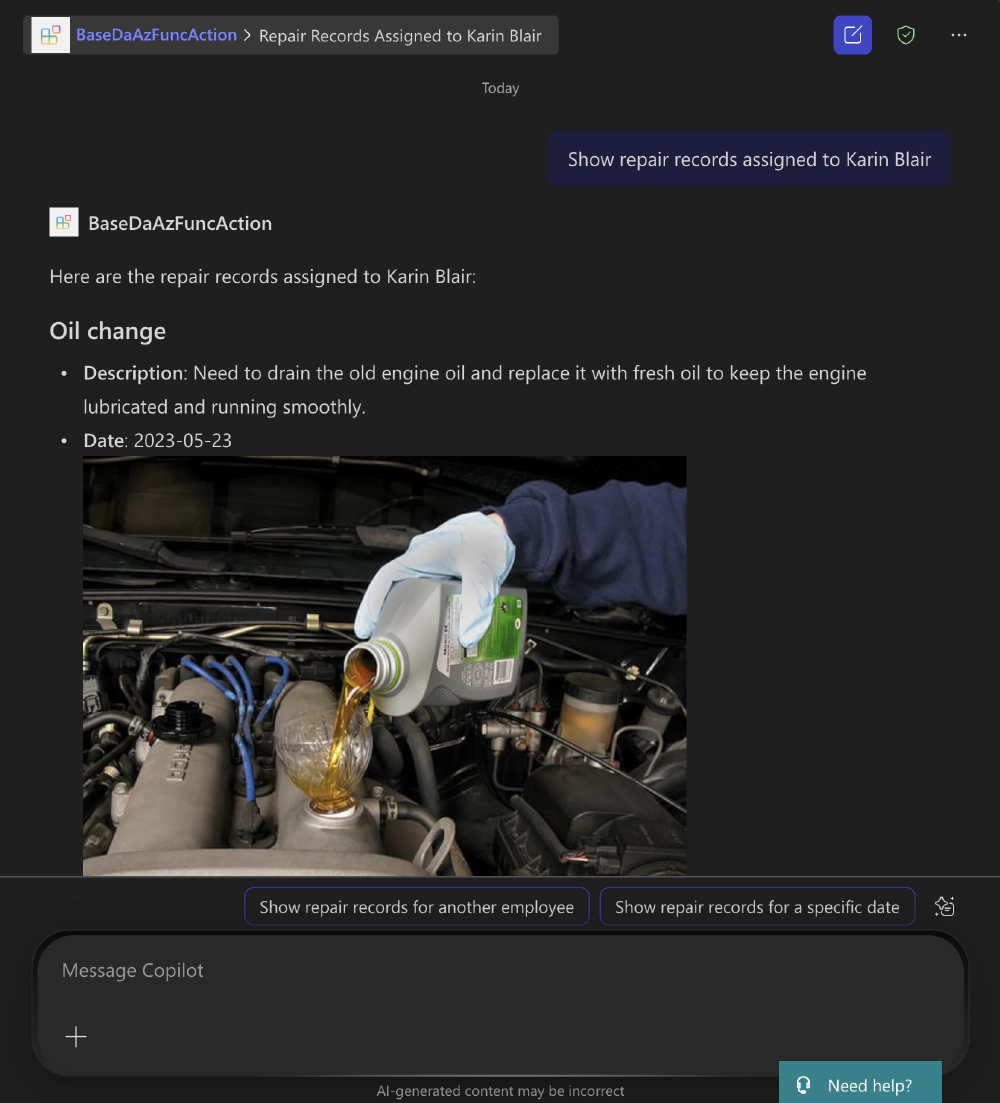
Successfully calling the API action from the base Microsoft 365 copilot declarative agent project template.
Benefits of a reusable template
By successfully adding TypeSpec support to an existing Azure Function declarative agent project, you have created a foundation that can serve as a template for future projects. This custom template bridges the gap until Microsoft provides an official TypeSpec template that includes Azure Functions.
Your enhanced template will include all the necessary configuration files, build scripts, and project structure needed to start new declarative agent projects with TypeSpec support. This saves time and ensures consistency across your agent development efforts.
Conclusion
Adding TypeSpec support to existing Microsoft 365 declarative agent projects with Azure Functions provides significant benefits for developers who need more control over their API development workflow. By understanding how to integrate TypeSpec into the existing project structure, you gain insight into the build toolchain and can customize it to meet your specific needs. This approach creates a more maintainable development environment and serves as a foundation for future agent projects until Microsoft releases more comprehensive templates.
What challenges have you encountered when working with declarative agents?
Share your experiences in the comments below, or let me know if you’d like to see more advanced TypeSpec configurations covered in future articles!
Download Article Resources
Want the resources for this article? Enter your email and we'll send you the download link.
Microsoft MVP, Full-Stack Developer & Chief Course Artisan - Voitanos LLC.
Andrew Connell is a full stack developer who focuses on Microsoft Azure & Microsoft 365. He’s a 22-year recipient of Microsoft’s MVP award and has helped thousands of developers through the various courses he’s authored & taught. Whether it’s an introduction to the entire ecosystem, or a deep dive into a specific software, his resources, tools, and support help web developers become experts in the Microsoft 365 ecosystem, so they can become irreplaceable in their organization.


