The Challenge of Debugging Minified JavaScript
The problem with debugging SharePoint Framework (SPFx) projects in production is that all your JavaScript has been minified from the original TypeScript. When code is in production, it’s all compressed, with variable names reduced to single or double letters. That’s great for performance in shrinking the amount of data users have to download.
But when you need to debug code in production, nobody can easily read that code! The browser tries to help by pretty-printing the code instead of showing it all on one line, but it’s still not great for debugging.
Thankfully, source maps help solve that problem, but SPFx projects make it hard to use them.
In this article, you’ll learn how you can configure your project to generate source maps, even in production mode, and how to use them to debug deployed projects.
Learn the SharePoint Framework With Andrew & Voitanos!
The process shown in this article is covered in my Mastering the SharePoint Framework - Ultimate Bundle course. The course contains chapters on customizing the build toolchain customizing gulp and the webpack configuration.
Understanding Source Maps
What Are Source Maps?
Source maps are a JavaScript concept that maps minified code back to its original form. When I transpile TypeScript to JavaScript or minify JavaScript, a source map creates a connection between the minified code and the original code.
A source map contains symbols that link lines in the compiled JavaScript to the corresponding lines in the original TypeScript or unminified JavaScript. This means if I set a breakpoint on a line of TypeScript, it sets that breakpoint on the equivalent line in the minified and bundled JavaScript.
When the browser runs the code and hits the breakpoint, instead of showing me the minified JavaScript, it shows me the original TypeScript.
The SharePoint Framework Challenge
There’s a problem with the SPFx build toolchain that makes using source maps difficult. The SPFx will create source maps when you’re in debug mode, which allows your breakpoints to work correctly. However, in production, it stops generating source maps.
This is frustrating because production is one of the most important times when you need source maps. Fortunately, you can fix this with a custom webpack configuration, which I’ll share with you.
Using Source Maps in Production: 4 Options
Once you have source maps for your production code, there are several ways to use them:
Option 1: Manual Source Map Loading
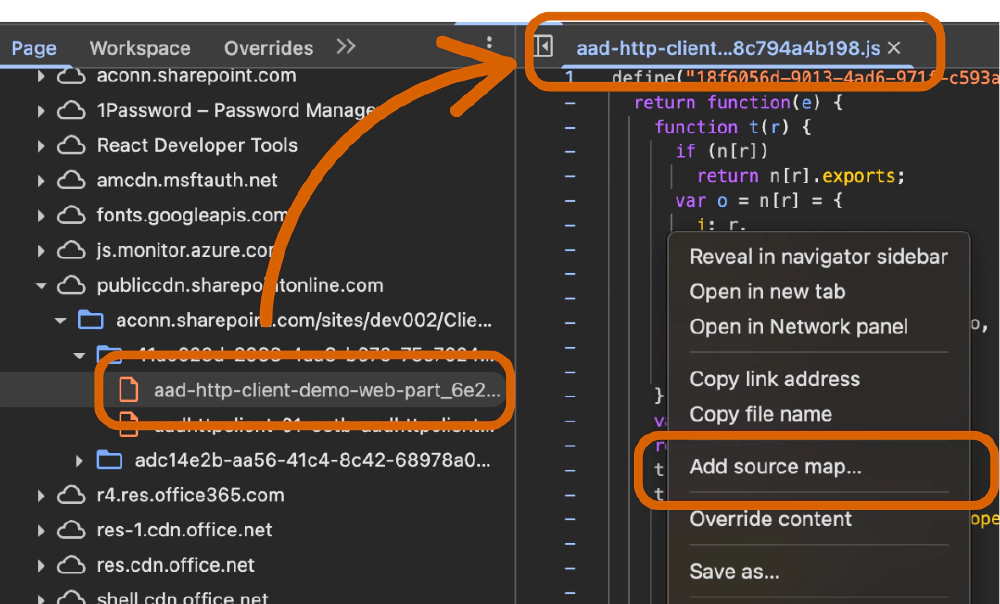
I can go to the browser’s DevTools, open the JavaScript file in production, and then right-click on the source (the minified JavaScript). From there, I can add a source map by selecting the file that was generated when the bundle was created.

Manually loading source maps in the browser's developer tools
This approach works, but has disadvantages:
- All developers need to know where the source maps are located.
- You must ensure that the production bundle matches the source map we have locally or in the repository.
- You must load a source map manually for each file you want to debug. Considering most client-side solutions are comprised of multiple files and chunks, that’s a tedious process.
Implement This Option
See how to implement this in the section Step-by-Step Implementation Guide.
Option 2: Local Source Map Hosting
Instead of manually loading source maps each time, I can keep all source maps locally and spin up a local web server. For example, I can host them on localhost:1313.
At the bottom of each minified JavaScript file, there’s a comment that points to the source map URL:
//# sourceMappingURL=http://localhost:1313/hello-world-web-part_5eb2c5e16c07ca329f33.js.map
By setting up a local server, the browser can find these source maps because it’s running on localhost. This approach is more efficient, especially when debugging multiple JavaScript files.
But, similar to the first option, it has disadvantages:
- All developers need to know where the source maps are located.
- You must ensure that the production bundle matches the source map we have locally or in the repository.
Implement Option 2: Local Source Map Hosting
See how to implement this in the section Step-by-Step Implementation Guide, specifically Step 3: Choose How to Host Source Maps.
Option 3: Package Source Maps in SPFx Package
An even better solution is to include source maps in your SharePoint Framework solution package - the *.sppkg file. After creating your bundle, you can take all the source maps and include them in the SPFx file.
Now, when the SPFx solution is deployed to production, the source maps will get uploaded to the ClientSideAssets folder along with the component’s JavaScript bundle. Because the browser will automatically always look for a source map in the same location where it loaded the minified bundle.
To do this, I’ve created a custom gulp task package-sourcemaps that adds the source maps to the *.sppkg file after you’ve created it. So, all you have to do is add one more gulp task when you want to deploy your solution, and you get simplified debugging out of the box!
This solution eliminates the final two (2) disadvantages the previous options above had; that developers have to keep track of the source amps & that the source maps & bundle are kept in sync.
The only potential downside is that someone could look at the original code, but that’s not usually a concern with SPFx solutions since they’re only available to those people within your organization. But, if that is an issue, there are other options.
Implement Option 3: Package Source Maps in SPFx Package
See how to implement this in the section Step-by-Step Implementation Guide, specifically Step 3: Choose How to Host Source Maps.
Option 4: Host Source Maps in a Secure Location
If you’re concerned about exposing your source code, you can host source maps in an accessible but secure location. For example, you could store them in an Azure Storage blob marked as private, so only specific people with permissions can access them.
This option is great for ISVs who provide SPFx solutions to their customers and want to protect their IP. Granted, minified code isn’t secure, it’s just obfuscated, but it’s better than letting your customers, or competitors, see the original TypeScript code.
Implement Option 4: Host Source Maps in a Secure Location
See how to implement this in the section Step-by-Step Implementation Guide, specifically Step 3: Choose How to Host Source Maps.
Step-by-Step Implementation Guide (5-6 Steps)
Here’s how to implement source maps in your SharePoint Framework projects:
Step 1: Generate Source Maps
First, we need to modify the webpack configuration that’s dynamically generated by the SPFx build toolchain when the gulp bundle task is run. This is done with some changes to the ./gulpfile.js file in the root of your project.
The build.configureWebpack.mergeConfig() method gives us a chance to make changes to the webpack configuration & return it to the SPFx build toolchain before it’s used:
build.configureWebpack.mergeConfig({
  additionalConfiguration: (generatedConfig) => {
    // make changes

    // return changed config to SPFx toolchain
    return generatedConfig;
  }
});
We’ll make some changes to the merge configuration and set up the necessary plugins.
Step 2: If in Production Mode, Enable Source Map Creation
As I said before, the build toolchain creates the source maps when you run the bundling process in debug mode (gulp bundle), but not when you run it in production mode (gulp bundle –production).
The first step is to determine if we’re in a production build using the included webpack Define plugin that the SPFx toolchain uses to flag if we’re in development mode, indicated with the DEBUG property. If so, we need to add a new rule to load the source maps that were generated from the gulp build task:
// get webpack's DefinePlugin to get the DEBUG prop SPFx's build toolchain adds
const definePlugin = generatedConfig.plugins.filter(p => p.definitions)[0];

if (definePlugin.definitions.DEBUG) {
  return generatedConfig;
}

const webpack = require('webpack');

// bundle existing source maps but not those in node_modules
const sourceMapRule = {
  test: /\.js$/,
  enforce: "pre",
  exclude: [/node_modules/],
  use: { "loader": "source-map-loader" }
};
if (generatedConfig.module.rules && generatedConfig.module.rules.length > 0) {
  generatedConfig.module.rules.push(sourceMapRule);
} else {
  generatedConfig.module.rules = [sourceMapRule];
}
Learn more about the webpack Define plugin from my article, Leveraging the webpack Define Plugin in SPFx Projects.
Here's a post that teaches you a technique that you can start leveraging in your SharePoint Framework (SPFx) projects right away!
https://www.voitanos.io/blog/leverage-webpack-define-plugin-spfx/

Step 3: Choose How to Host Source Maps
The next step is to determine how you want to store and load your source maps using one of the four options I presented above. This is important because when the JavaScript bundle is created by webpack, we need to tell the browser where to find the source map file. This is done by adding a comment on the last line of the bundle:
//# sourceMappingURL=http://localhost:1313/[url]
In this example, you’re planning to go with Option 2: Local Source Map Hosting, where you’ll host the source maps locally on your workstation when you start debugging.
Once you’ve decided which of the four (4) options you’ve chosen above, use the webpack SourceMapDevToolPlugin & configure it for the settings necessary for each option. This plugin accepts a configuration option with the following properties:
append: Appends the given value to the original asset. Refer to the plugin docs for available tokens.filename: Defines the output filename of the source map.
Depending how the option you’ve selected for hosting your source maps, add the following code to your webpack configuration changes:
Option 2: Local Source Map Hosting
generatedConfig.plugins.push(new webpack.SourceMapDevToolPlugin({
  append: '\n//# sourceMappingURL=http://localhost:1313/[url]',
  filename: '[file].map'
}));
To serve these source maps up, you can run the following command from the folder where you’re going to store them locally:
npx http-server -p 1313Option 3: Package Source Maps in SPFx Package
generatedConfig.plugins.push(new webpack.SourceMapDevToolPlugin({
  filename: '[file].map'
}));
Option 4: Host Source Maps in a Secure Location
generatedConfig.plugins.push(new webpack.SourceMapDevToolPlugin({
  append: '\n//# sourceMappingURL=https://cdn.voitanos.io/masteringspfx/sourcemaps/[url]',
  filename: '[file].map'
}));
Step 4: Configure the Minimizer
The next step requires a little extra work.
Normally, we use the TerserWebpackPlugin to minify and manage your JavaScript.
But the SPFx team has created a worker pool concept where you can parallelize webpack bundling configuration for projects with lots of bundles to create. This is done using the @rushstack/module-minifier package that leverages things like the WorkerPoolMinifier object, and it adds a lot of complexity.
Why?
We need to remove the existing minification configuration and add back a new one that will not only preserve source maps but also append the sourceMappingURL property to the end of our bundles. If we wanted to replicate their worker pool configuration, it would require a LOT of extra work.
Frankly, I don’t see this need all that often, so I’m not going to preserve it. Instead, I’m going to do what most SPFx developers will want to do and just keep it simple.
Learn More About Microsoft's Rush Stack Minification
If you’re interested in seeing how they do it, check the Rush Stack monorepo docs for their own customized webpack plugin: @rushstack/webpack5-module-minifier-plugin, specifically the part about the Parallel Execution.
Start by removing the current minimizer configuration…
if (generatedConfig.optimization.minimizer && generatedConfig.optimization.minimizer.length > 0) {
  generatedConfig.optimization.minimizer.pop();
}
Then, create a custom configuration that will include source maps, tell it to minify the bundle (mangle: true) to make the bundle as small as possible, and to aggressively compress the generated bundle (compress: { passes: 3, warnings: false }):
When you’re finished, add it to the configuration:
const TerserPlugin = require('terser-webpack-plugin');

const terserPlugin = new TerserPlugin({
  terserOptions: {
    sourceMap: {
      url: "[file].map"
    },
    format: {
      indent_level: 2,
      wrap_func_args: false
    },
    compress: { passes: 3, warnings: false },
    mangle: true
  }
});

generatedConfig.optimization.minimizer = [terserPlugin];
Step 5: Build and Package Your Solution
After implementing these changes, build and bundle your solution with:
$ gulp build
$ gulp bundle -p
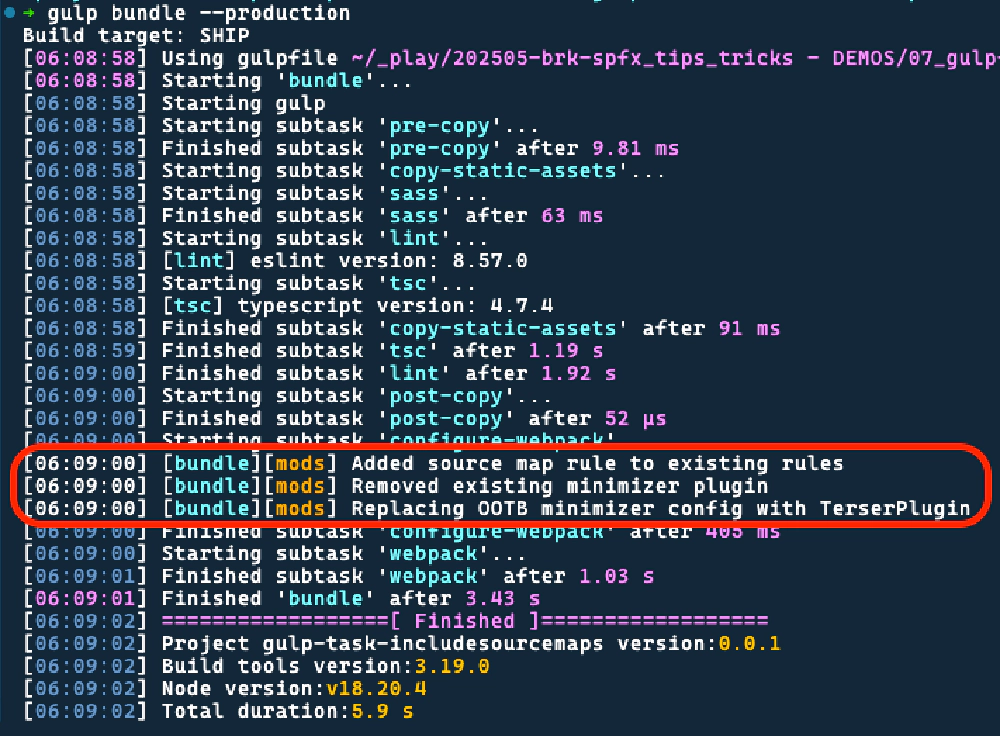
This will create your JavaScript bundle with source maps. In my version of the above changes, available via the download form at the end of this article, I add extra logging to show the updates:

Modified webpack configuration logging changes to the bundle to include source maps when building in production and appending the source map URL to the generated bundle.
At the bottom of each JavaScript file, you’ll find the source mapping comment:

Resulting JavaScript bundle with the modified `*sourceMappingURL` line pointing to the source map location.
Finally, then package your SPFx solution like you normally would!
$ gulp package-solution --production
Step 6 (Optional): Add Source Maps to the Package
Finally, if you chose Option 3: Package Source Maps in SPFx Package to deploy the source maps with the bundle to the ClientSideAssets library when the SPFx component is installed, you have one final step: you need to get the source maps into the *.sppkg file that you created.
The *.sppkg file is just a ZIP file that conforms to the Open XML Format to define the relationship of files within the ZIP. So, to include the source maps in the package, you need to open the ZIP, add the files, and define the relationships with each one.
To simplify this process, I’ve created a custom gulp task, package-sourcemaps, to do this for you.
Add the following to the end of your ./gulpfile.js
const gulp = require('gulp');
gulp.task('package-sourcemaps', function (callback) {
  if (!build.packageSolution.taskConfig.solution.includeClientSideAssets) {
    callback();
  } else {
    const path = require('path');
    const JSZip = require("jszip");
    const fs = require('fs');
    const { config } = require('process');

    const { zippedPackage } = { ...build.packageSolution.taskConfig.paths };
    const sppkgPath = path.join('sharepoint', zippedPackage);
    const distFolder = build.getConfig().distFolder;

    if (!fs.existsSync(sppkgPath)) {
      console.error(`Generated SPPKG file not found - must run 'gulp bundle --ship' and 'gulp package-solution --ship' before updating the package`);
      callback();
    } else {
      fs.readFile(sppkgPath, function (err, data) {
        if (err) throw err;

        // load .sppkg contents
        JSZip.loadAsync(data).then(function (zip) {
          // get names of all source maps - can be multiple
          //   if the project has multiple bundles
          const mapFiles = fs.readdirSync(distFolder).filter(f => f.endsWith('.map'));

          // add support for map files or SharePoint will fail
          //   when trying to extract the .js.map files
          zip
            .file('[Content_Types].xml')
            .async('string')
            .then(contentTypes => {
              contentTypes = contentTypes.replace('</Types>', '<Default Extension="map" ContentType="application/json"></Default></Types>');
              zip.file('[Content_Types].xml', contentTypes);
              return zip.file('_rels/ClientSideAssets.xml.rels').async('string');
            })
            .then(rels => {
              // get the ID of the last rel to generate
              //   IDs of additional rels for source maps
              var relId = 0;
              var match;
              const regex = RegExp('"r([^d]+)', 'g')
              while ((match = regex.exec(rels)) !== null) {
                relId = parseInt(match[1]);
              }
              const mapsRels = mapFiles.map(m => `<Relationship Type="http://schemas.microsoft.com/sharepoint/2012/app/relationships/clientsideasset" Target="/ClientSideAssets/${m}" Id="r${++relId}"></Relationship>`).join('');
              rels = rels.replace('</Relationships>', `${mapsRels}</Relationships>`);
              zip.file('_rels/ClientSideAssets.xml.rels', rels);

              // add source maps to the ClientSideAssets folder
              const ClientSideAssets = zip.folder('ClientSideAssets');
              mapFiles.forEach(m => {
                const jsMap = fs.readFileSync(path.join(distFolder, m), 'utf-8');
                ClientSideAssets.file(m, jsMap);
              });

              // regenerate the .sppkg with the above additions
              zip
                .generateNodeStream({ type: 'nodebuffer', streamFiles: true })
                .pipe(fs.createWriteStream(sppkgPath))
                .on('finish', function () {
                  callback();
                });
            });
        });
      });
    }
  }
});
This task uses one NPM package that’s part of the existing dependencies, but you should always install packages you need in your project, regardless of whether they’re included as dependencies from another package in your dependency tree:
$ npm install jszip --save-dev
Finally, run the following task from the same location where you ran the gulp build, bundle, and package-solution tasks:
$ gulp package-sourcemaps
This command will find all source maps, add them to the package, update the package definition, and then save the updated package file. The package size will increase, but the bundle size remains unchanged.

Output from the custom gulp task 'package-sourcemaps'
Before you ran the package-sourcemaps command, if you looked at the size of the *.sppkg, you’ll see the difference in size after stuffing the source maps in it. In my version of the task, available via the download form at the end of this article, I add extra logging to output the initial and new size of the file.
As you can see from the above screenshot, the single source map in this simple solution represents about 68% of the total size of the new package. But, that’s not important as it only impacts the size of the package that’s uploaded, not the bundle. The source map is only loaded when the browser needs it, and that’s only when a developer has opened the browser’s developer tools and the source JavaScript bundle source file in the tools.
Conclusion
By using source maps in production, you can significantly improve your ability to debug issues in SharePoint Framework solutions. Whether you choose to host source maps locally, include them in your package, or use a remote hosting location, these techniques will help you identify and fix problems more efficiently.
Remember to consider your specific requirements when deciding how to implement source maps in your projects. If code visibility is a concern, use the Azure Storage Blob option to keep your source maps private while still benefiting from their debugging capabilities.
Make it Easy - Get my gulpfile.js!
Want the easy button to make all these changes? use the form below to download a copy of my gulpfile.js that contains all these changes! All you need to do is decide which of the four (4) options I outlined in the article and uncomment the necessary part of the gulpfile.
Download Article Resources
Want the resources for this article? Enter your email and we'll send you the download link.
Microsoft MVP, Full-Stack Developer & Chief Course Artisan - Voitanos LLC.
Andrew Connell is a full stack developer who focuses on Microsoft Azure & Microsoft 365. He’s a 22-year recipient of Microsoft’s MVP award and has helped thousands of developers through the various courses he’s authored & taught. Whether it’s an introduction to the entire ecosystem, or a deep dive into a specific software, his resources, tools, and support help web developers become experts in the Microsoft 365 ecosystem, so they can become irreplaceable in their organization.


